Cartographer installation
Cartographer is Eddy current bed probe, which makes bed meshing a lot faster and a lot more percise. There are several such probes out there. Most known is Beacon, which is made by US fellas, Cartographer, which is made by UK fellas and quite some of them in AliExpress
They are known for their speed and accuracy. If regular probe accuracy is around 0.001mm, then Eddy current probes are 0.0001mm, which is 10x more accurate. Their probing speed is limited by printer head moving speed and printer motherboard CPU. In theory they can do some milion measurements per second
Here's a 10 sec 15x15 grid full bed mesh, which takes with regular Probe around 45 minutes
Installation
Hardware and mounting
For installation can use this mount (for X-Max 3), For X-Plus 3, there's remix, original Beacon mount also works, but it's slightly flimsier. Make sure to print mount out of something that can sit near bed and wouldn't deform. PAHT-CF is good candidate, ABS and ASA work too, their GF and CF parts even better. PLA and PETG won't survive the bed heat from bed when using higher temperatures
Needed hardware:
4x M3x14 bolts original stock probe mount bolts. Stock probe has 2 bolts, there should be 2 extra that came with printer / official upgrade package as spare parts
2x M3 nuts to secure probe in place. Those didn't come with printer, had to buy
2x M2.5x16 had those with one of Qidi printers as spare parts too, can't remember if it was iFast or X-Max 3
Optional zipties to secure cable
Do not put cable into cable chain, USB cable is not rated for it, it's good to have it rather loose, so there's no single point that keeps on bending (Some users have reported in Discord, that cable broke after around 1k print hours in cable chain)
Good installation would be like this, just 3 rather loose zip-ties to secure the cable
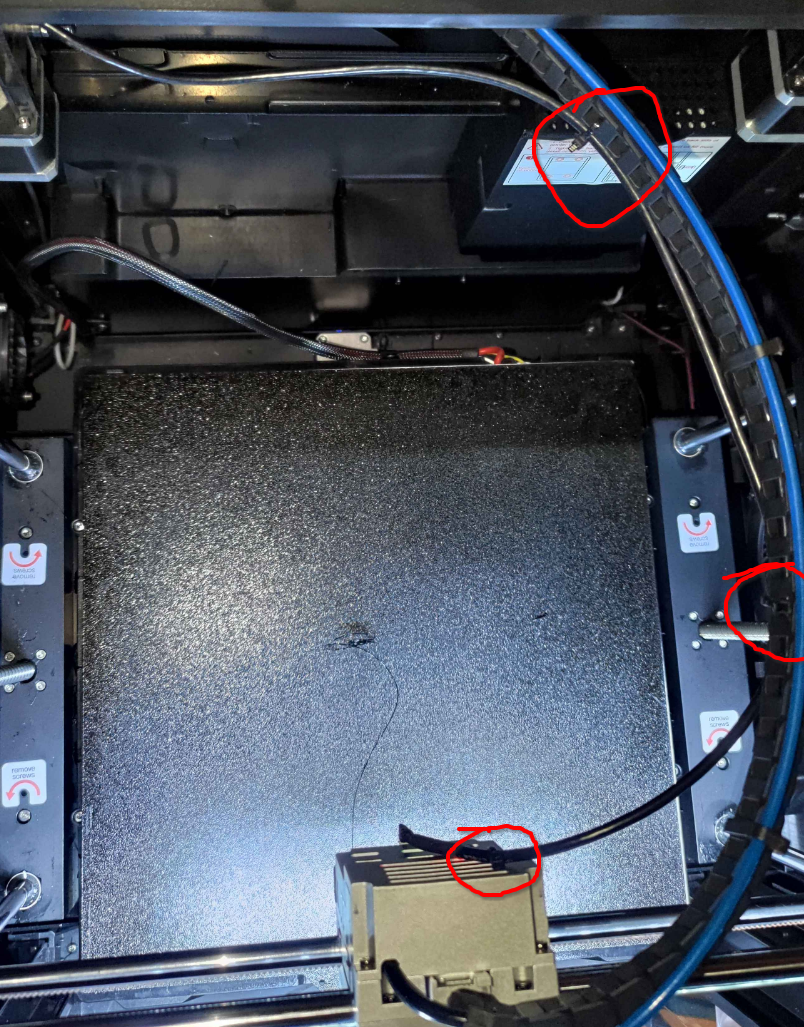
After mounting it, move toolhand manually thro all 4 corners and check that cable doesn't get stuck behind anything
Software installation
For Cartographer software installation you can refer to it's own doc, but since there are some changes needed, wrote it down in here also. Follow Carto doc when you know what you are doing. Installing on stock Qidi firmware refer to this doc
First of all, need to SSH into printer. You can find printer IP from printer screen under network tab or from router.
SSH user is `mks` to printer with `mks@IP_ADDR` for example `mks@192.168.88.36`
Password is `makerbase`
By default Qidi printers have wrong system time, first need to update that by running apt install ntp and dpkg-reconfigure tzdata. Qidi Official wiki has good guide on it: https://wiki.qidi3d.com/en/Memo/System-Time-Modification
After updating datetime, going to install Cartographer software. There are two ways to do it, easy way and hard way. First going thro easy way
Easy way
Easy way will require minimal changes, but will be limited to having only bed mesh. For auto Z offset need to follow advanced part
cd-- Make sure you are at home directorygit clone https://github.com/Cartographer3D/cartographer-klipper.git-- Get Carto softwarecd cartographer-klipper-- Go to Cartographer foldergit checkout v1.0.0-- This will make you run older version of Carto software, that works with Qidi printers out of boxchmod +x ./install.sh-- Make Carto installation script executable./install.sh-- Execute install script- Running installation might give warning about Python version. It's safe to ignore it, since we pinned Cartographer software version to v1.0.0
After cartographer is installed, need to make some modifications to printer config. It's easiest to make it thro printer web UI (Fluidd). It's accessible at printer IP and port 10088, like http://192.168.88.36:10088/#/configure (replace IP with your printer IP).
For more advanced users, I'd recommend to connect VSCode to printer and edit ~/klipper_config/printer.cfg directly
Inside [stepper_z] need to change homing_retract_dist
- homing_retract_dist: 8.0
+ homing_retract_dist: 0 # cartographer needs this to be set to 0, was 8.0
Inside [homing_override] need to get rid of references to printer.probe. printer.probe["x_offset"] is going to be removed and printer.probe["y_offset"] is going to be replaced with 25 (needs to be hardcoded, Qidi older Klipper doesn't work too well with variables, or McSneaky has no idea how to use them)
-    G1 X{printer.toolhead.axis_maximum.x/2 - printer.probe["x_offset"]} Y{printer.toolhead.axis_maximum.y/2 - printer.probe["y_offset"]} F7800
+    G1 X{printer.toolhead.axis_maximum.x/2} Y{printer.toolhead.axis_maximum.y/2 - 25} F7800
Inside [bed_mesh] section need to adjust mesh_min. It's also advised to change probe_count and speed. Those two can be whatever you feel comfortable with. Sweet spot seems to be speed somewhere between 150 to 600 and probe_count somewhere around 15 (odd numbers in probe_count are good, this way bed center point is also probed)
[bed_mesh]
-speed:150
+speed:300               #调平速度 CARTO CHANGED, used to be 150
horizontal_move_z:10   #调平中Z抬高高度
-mesh_min:25,10        #探测点最小位置
+mesh_min:25,20        #探测点最小位置 # CARTO CHANGED, used to be 25,10
mesh_max:315,315      #探测点最大位置
-probe_count:9,9      #调平点数
+probe_count:15,15      #调平点数 # CARTO CHANGED, used to be 9,9
algorithm:bicubic
bicubic_tension:0.2
mesh_pps: 4, 4
Replace probe or bltouch section with cartographer. Inside cartographer default settings need to change y_offset to 25 and serial to your USB serial
To get USB serial run `ls
- Comment out / remove whole [homing_override] section
- Under [bed_mesh]
mesh_min:25,25 # this needs to be set to 25,25 from stock 25,15
speed:300 # increase speed for faster scanning, can leave stock
probe_count:15,15 # increase points count, can leave stock
- Add [cartographer] and [safe_z_home] sections following to their doc
- under [cartographer] need to set y_offset: 25
- under [safe_z_home] need to set home_xy_position: 162.5, 162.5
- Remove / comment out any [probe] and [bltouch] sections
- Follow Carto docs for initial calibration. It's super easy, just 2-3 steps