Cartographer installation with Qidi stock firmware
Cartographer is Eddy current bed probe, which makes bed meshing a lot faster and a lot more percise. There are several such probes out there. Most known is Beacon, which is made by US fellas, Cartographer, which is made by UK fellas and quite some of them in AliExpress
They are known for their speed and accuracy. If regular probe accuracy is around 0.001mm, then Eddy current probes are 0.0001mm, which is 10x more accurate. Their probing speed is limited by printer head moving speed and printer motherboard CPU. In theory they can do some milion measurements per second
Here's a 10 sec 15x15 grid full bed mesh, which takes with regular Probe around 45 minutes
Installation
This guide works with both V2 and V3 probes
Hardware and mounting
For installation can use this mount (for X-Max 3), For X-Plus 3, there's remix, original Beacon mount also works, but it's slightly flimsier. Make sure to print mount out of something that can sit near bed and wouldn't deform. PAHT-CF is good candidate, ABS and ASA work too, their GF and CF parts even better. PLA and PETG won't survive the bed heat from bed when using higher temperatures
Needed hardware:
4x M3x14 bolts original stock probe mount bolts. Stock probe has 2 bolts, there should be 2 extra that came with printer / official upgrade package as spare parts
2x M3 nuts to secure probe in place. Those didn't come with printer, had to buy
2x M2.5x16 had those with one of Qidi printers as spare parts too, can't remember if it was iFast or X-Max 3
Optional zipties to secure cable
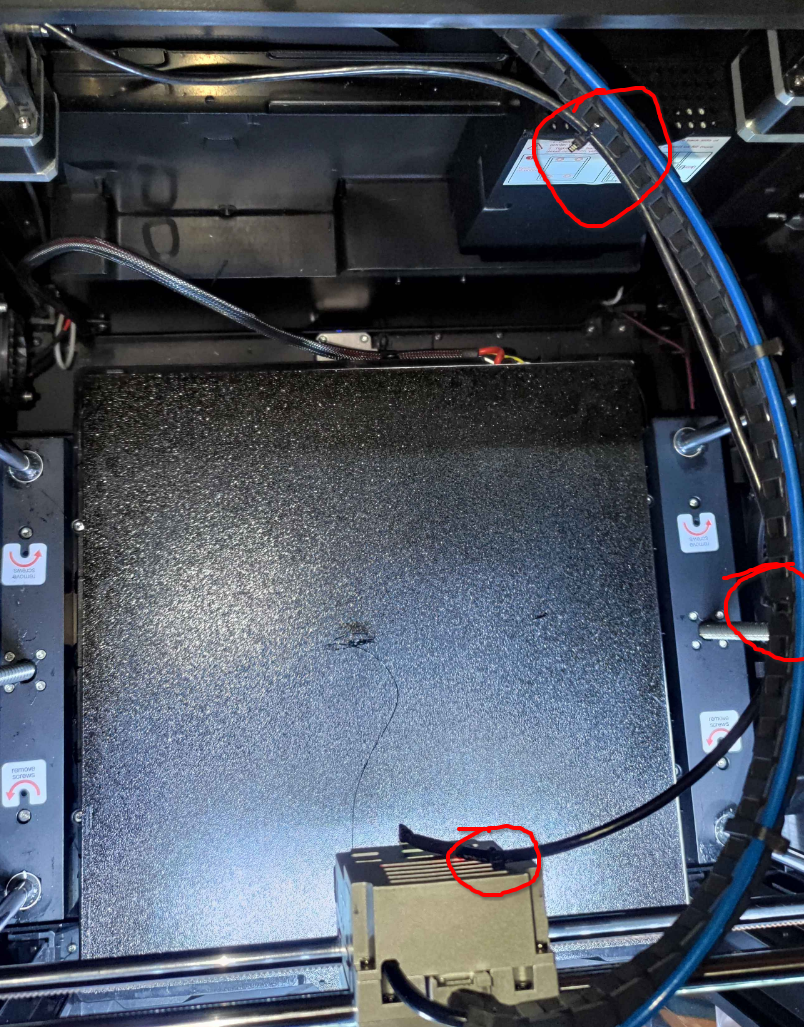
Do not put cable into cable chain, USB cable is not rated for it, it's good to have it rather loose, so there's no single point that keeps on bending (Some users have reported in Discord, that cable broke after around 1k print hours in cable chain)
Good installation would be like this, just 3 rather loose zip-ties to secure the cable
After mounting it, move toolhand manually thro all 4 corners and check that cable doesn't get stuck behind anything
Software installation
For Cartographer software installation you can refer to it's own doc, but since there are some changes needed, wrote it down in here also. Follow Carto doc when you know what you are doing. Installing on stock Qidi firmware refer to this doc
First of all, need to SSH into printer. You can find printer IP from printer screen under network tab or from router.
SSH user is `mks` to printer with `mks@IP_ADDR` for example `mks@192.168.88.36`
Password is `makerbase`
By default Qidi printers have wrong system time, first need to update that by running apt install ntp and dpkg-reconfigure tzdata. Qidi Official wiki has good guide on it: https://wiki.qidi3d.com/en/Memo/System-Time-Modification
After updating datetime, going to install Cartographer software. Writing this guide in two parts, Bed meshing and Auto Z offset, since bed meshing is rather simple, auto z offset requires some more work with older Qidi firmwares
Bed meshing
Easy way will require minimal changes, but will be limited to having only bed mesh. For auto Z offset need to follow advanced part
cd-- Make sure you are at home directorygit clone https://github.com/Cartographer3D/cartographer-klipper.git-- Get Carto softwarecd cartographer-klipper-- Go to Cartographer foldergit checkout v1.0.0-- This will make you run older version of Carto software, that works with Qidi printers out of boxchmod +x ./install.sh-- Make Carto installation script executable./install.sh-- Execute install script- Running installation might give warning about Python version. It's safe to ignore it, since we pinned Cartographer software version to v1.0.0
After cartographer is installed, need to make some modifications to printer config. It's easiest to make it thro printer web UI (Fluidd). It's accessible at printer IP and port 10088, like http://192.168.88.36:10088/#/configure (replace IP with your printer IP).
For more advanced users, I'd recommend to connect VSCode to printer and edit ~/klipper_config/printer.cfg directly
Inside [stepper_z] need to change homing_retract_dist
- homing_retract_dist: 8.0
+ homing_retract_dist: 0 # cartographer needs this to be set to 0, was 8.0
Inside [homing_override] need to get rid of references to printer.probe. printer.probe["x_offset"] is going to be removed and printer.probe["y_offset"] is going to be replaced with 25 (needs to be hardcoded, Qidi older Klipper doesn't work too well with variables, or McSneaky has no idea how to use them)
-    G1 X{printer.toolhead.axis_maximum.x/2 - printer.probe["x_offset"]} Y{printer.toolhead.axis_maximum.y/2 - printer.probe["y_offset"]} F7800
+    G1 X{printer.toolhead.axis_maximum.x/2} Y{printer.toolhead.axis_maximum.y/2 - 25} F7800
Inside [bed_mesh] section need to adjust mesh_min. It's also advised to change probe_count and speed. Those two can be whatever you feel comfortable with. Sweet spot seems to be speed somewhere between 150 to 600 and probe_count somewhere around 15 (odd numbers in probe_count are good, this way bed center point is also probed)
[bed_mesh]
-speed:150
+speed:300               #调平速度 CARTO CHANGED, used to be 150
horizontal_move_z:10   #调平中Z抬高高度
-mesh_min:25,10        #探测点最小位置
+mesh_min:25,20        #探测点最小位置 # CARTO CHANGED, used to be 25,10
mesh_max:315,315      #探测点最大位置
-probe_count:9,9      #调平点数
+probe_count:15,15      #调平点数 # CARTO CHANGED, used to be 9,9
algorithm:bicubic
bicubic_tension:0.2
mesh_pps: 4, 4
Replace probe or bltouch section with cartographer. Inside cartographer default settings need to change y_offset to 25 and serial to your USB serial
To get USB serial run ls /dev/serial/by-id/ this will give you toolhead ID (usb-Klipper-rp2040-something) and Cartographer ID (usb-Cartographer-something). Copy / write down Cartographer ID
In the end your cartographer config should look something like this:
Be sure to update "serial" and "y_offset"
[cartographer]
# PASTE IN YOUR ID TO HERE!
serial: /dev/serial/by-id/usb-Cartographer_614e_1C0028001343565537353020-if00
#   Path to the serial port for the Cartographer device. Typically has the form
#
#   If you are using the CAN Bus version, replace serial: with canbus_uuid: and add the UUID.
#   Example: canbus_uuid: 1283as878a9sd
#
speed: 40.
#   Z probing dive speed.
lift_speed: 5.
#   Z probing lift speed.
backlash_comp: 0.5
#   Backlash compensation distance for removing Z backlash before measuring
#   the sensor response.
x_offset: 0.
#   X offset of cartographer from the nozzle.
y_offset: 25 ## BE SURE TO SET TO 25
#   Y offset of cartographer from the nozzle.
trigger_distance: 2.
#   cartographer trigger distance for homing.
trigger_dive_threshold: 1.5
#   Threshold for range vs dive mode probing. Beyond `trigger_distance +
#   trigger_dive_threshold` a dive will be used.
trigger_hysteresis: 0.006
#   Hysteresis on trigger threshold for untriggering, as a percentage of the
#   trigger threshold.
cal_nozzle_z: 0.1
#   Expected nozzle offset after completing manual Z offset calibration.
cal_floor: 0.1
#   Minimum z bound on sensor response measurement.
cal_ceil:5.
#   Maximum z bound on sensor response measurement.
cal_speed: 1.0
#   Speed while measuring response curve.
cal_move_speed: 10.
#   Speed while moving to position for response curve measurement.
default_model_name: default
#   Name of default cartographer model to load.
mesh_main_direction: x
#   Primary travel direction during mesh measurement.
#mesh_overscan: -1
#   Distance to use for direction changes at mesh line ends. Omit this setting
#   and a default will be calculated from line spacing and available travel.
mesh_cluster_size: 1
#   Radius of mesh grid point clusters.
mesh_runs: 2
#   Number of passes to make during mesh scan.

# [safe_z_home]
# home_xy_position: 162.5, 162.5 # CARTO CHANGED
# # Example home_xy_position: 175,175 - This would be for a 350 * 350mm bed.
# z_hop: 3

[gcode_macro PROBE_CALIBRATE]
gcode:
    CARTOGRAPHER_CALIBRATE
Notice, that in the end there's also macro for PROBE_CALIBRATE, don't forget to paste that in
Finally there's also some references to printer.probe in [gcode_macro M4029] need to replace them too
-    G1 X{printer.toolhead.axis_maximum.x/2 - printer.probe["x_offset"]} Y{printer.toolhead.axis_maximum.y/2 - printer.probe["y_offset"]} F7800
+    G1 X{printer.toolhead.axis_maximum.x/2} Y{printer.toolhead.axis_maximum.y/2 - 25} F7800
Now Cartographer is installed and configured. Next step is to do initial calibration
Don't forget to hit "Save and restart" in web UI!
Initial calibration
There's no Qidi specifics in here. There are just two protips:
- If bed doesn't want to move up anymore and you get error: "out of bounds". Turn off printer and manually turn bed leadscrews to get bed close to nozzle. About ~5-10mm
- Hold your hand on power off switch during calibration and when doing initial test print. In case you did something wrong bed might collide to nozzle. It's good to turn off printer real fast then to not cause damage to PEI sheet
Other than that two, follow Cartographer docs: https://docs.cartographer3d.com/cartographer-probe/installation-and-setup/cartographer-with-input-shaper-v2-and-v3-hybrid
Everything below is still WIP
Auto Z offset AKA Carto Survey
Cartographer Survey installation consists of two steps: Updating Carto Klipper plugin on printer and Updating Carto own firmware
Updating Carto Klipper plugin
First, backup your printer.cfg, then remove all Carto, BLTouch, Scanner and Probe sections in there. Also at the end of printer.cfg remove [cartographer model default] section
SSH to printer and go to ~/cartographer-klipper folder. If you don't have that, follow guide for Carto installation above
To get latest Cartographer code to your printer:
git stashto save all your changesgit checkout mainto make your code follow main Cartographer codebasegit reset --hard @{u}to make sure you have exactly the same code locally in printer, as in Cartographer Github
Then run the install script with ./install.sh. If it gives permission error or sais it's not executable, run chmod +x ./instal.sh to make Carto install script executable
This will most likely result in some warnings like on image below. They are safe to ignore
Next up, we need to
Update Cartographer firmware
QIDI Printers use USB version of Cartographer
Firmware update requries pyserial Python package. To get it, we first need to install PIP (Package Installer for Python)
sudo apt install python3-pipto install PIP for Python 3pip3 install pyserialto install pyserial package for Python 3
Download latest version of firmware updater script: https://firmware.cartographer3d.com/firmware.sh It can be put to some random place.
Before running it, it requires some modifications. In all the places where there's ~/klippy-env/bin/python replace it with python3
- ~/klippy-env/bin/python
+ python3
Most likely there's about 10 places where it needs to be replaced
Next up, need to make it executable with chmod +x ./firmware.sh
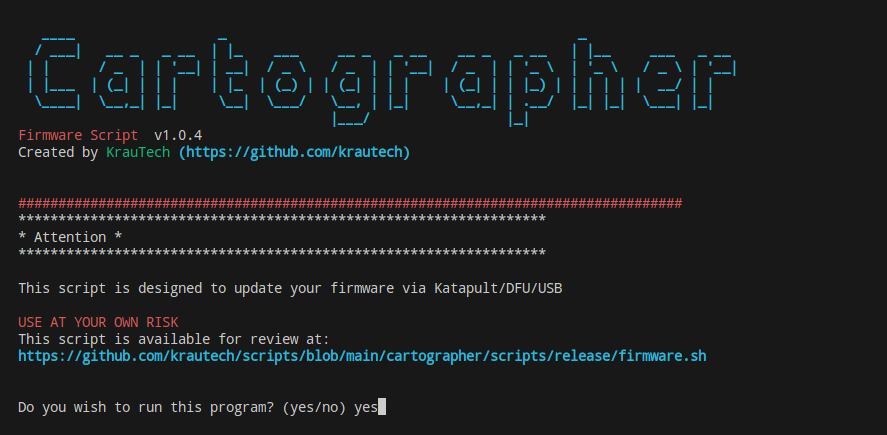
Run the script ./firmware.sh
You should see something like this. Type in yes
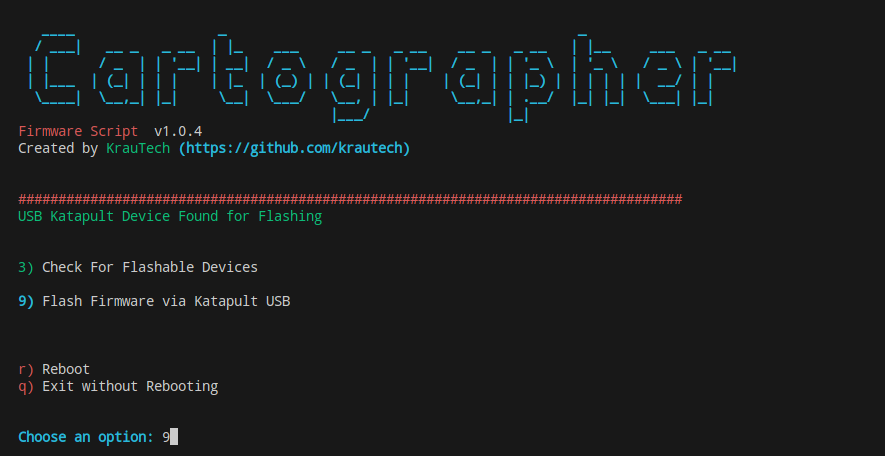
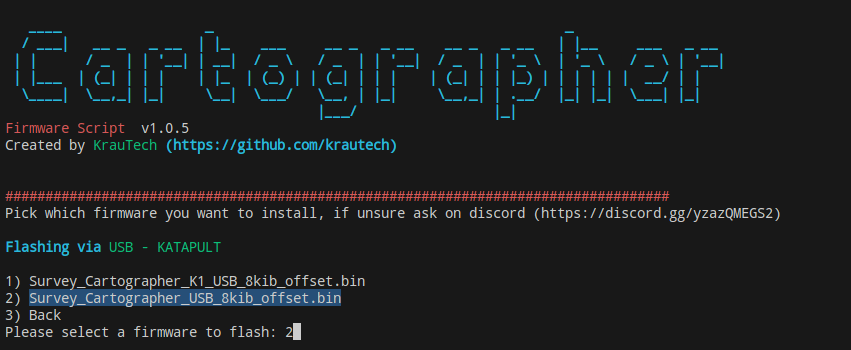
Next up, pick 9
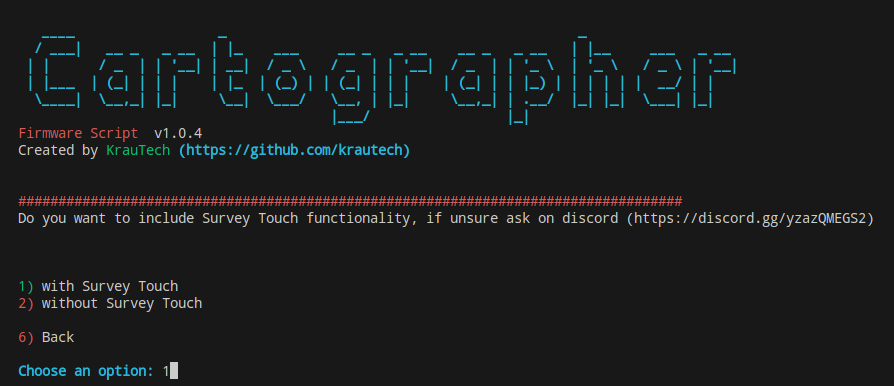
Then pick 1 for Survey Touch
Then pick 2 for USB Cartographer
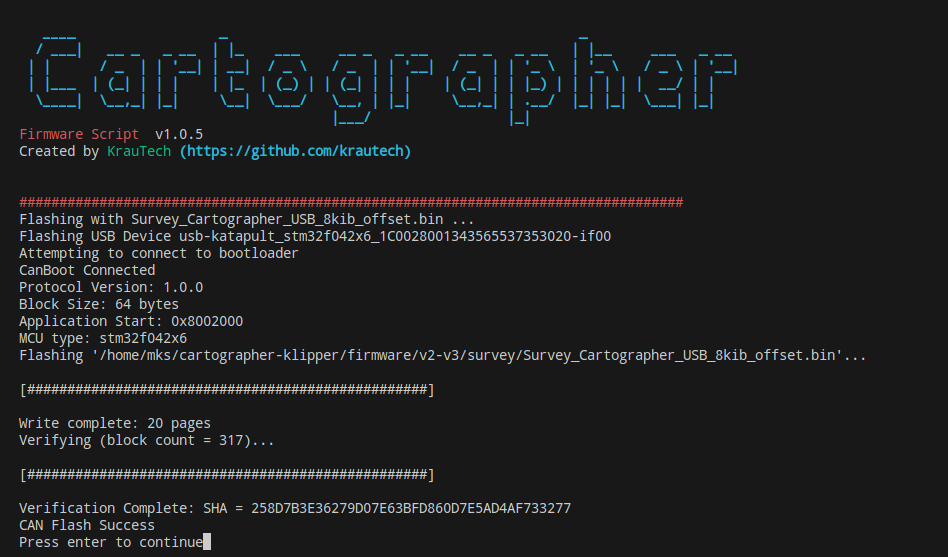
Give it some seconds. You should see nice loading bar and then "Success"
After installing, it will ask for sudo password (makerbase) to restart Klipper
It will take you back to beginning. Now need to hard restart printer. Turn off power from back of the printer. Wait for ~10 sec and then turn it back again. You can confirm everything is OK, if you run ls /dev/serial/by-id and see usb-Cartographer in there. If you see usb-STM, then something is off. Try to restart printer again or re-flash
Now we get back to installing Cartographer Klipper plugin. It's quite a pain tbh..
Install Fortan compiler
First, we need Fortan compiler, coz gotta love Python packages.. sudo apt-get install gfortran to install Fortan
Increase swap
Then, since compiling all those packages takes quite some RAM, we need to increase that. Sadly there's no way to increase RAM itself. Falling back to increasing swap
But since swap partition size can't be increased, we'll create new swap file and use that on primary partition
You can check your current swap file with sudo swapon --show most likely it is /dev/zram0
sudo swapoff /dev/zram0to turn off current swap filesudo dd if=/dev/zero of=/swapfile bs=1MB count=8192to create new 8gb swap filesudo chmod 600 /swapfileto add correct permissions to swap file- Edit /etc/fstab with favourite editor and add
/swapfile swap swap defaults 0 0to the end of it sudo mkswap /swapfileto mark that file as swap filesudo swapon /swapfileto turn swap back onswapon --showto check, if /swapfile is in use and everythign is OK
Increase /tmp size
Actually, there's no nice way to increase /tmp size, since it's on standalone partition, like swap. Since huge /tmp size is only needed by pip in install script, we can modify install.sh
On line about 30, there should be something like this: "${KENV}/bin/pip" install -r "${BKDIR}/requirements.txt"
Need to prefix it with TMPDIR=/home/mks/cartographer-klipper/compiler-temp
- "${KENV}/bin/pip" install -r "${BKDIR}/requirements.txt"
+ TMPDIR=/home/mks/cartographer-klipper/compiler-temp "${KENV}/bin/pip" install -r "${BKDIR}/requirements.txt"
Change requirements :)
In Carto folder there's requirements.txt file. By default Cart requires stuff for Python 3, but since we are on Python 2, need to downgrade requirements
Lower scipy and matplotlib versions
- scipy>=1.10.0
- matplotlib>=3.7.0
+ scipy>=1.2.3
+ matplotlib>=2.2.5
Actually installing Klipper plugin
Since while Python is compiling things, printer will be totally unresponsive (even to SSH) for several hours. Can expect it to take 1-4h or so
To make sure compile keeps on going, it's good idea to start it in screen session and then detach from it. This way compiling isn't tied to SSH session
screen -RL cartoto start new screen session named carto with -L to enable logging to file (in case of crashes)- This will tell smth about: "new screen started" or something. Press "Enter"
./install.shinside screen session- Detach from screen by pressing Ctrl+a followed by d. Note the lower case
- If you want to see what's going on, use
htoportail -f ~/screenlog.0
- If you want to see what's going on, use
- Wait some hours
Replace scanner.py with https://gist.github.com/McSneaky/0e80e1562aa22e112936aed9db1cc062 and follow Carto guide from Configuration step https://docs.cartographer3d.com/cartographer-probe/survey-touch#configuration

