This guide works with both V2 and V3 probes
#### Hardware and mounting For installation can use [this mount](https://www.printables.com/model/692991-qidi-x3-series-beacon-cartographer-probe-low-profi) (for X-Max 3), For X-Plus 3, [there's remix](https://www.printables.com/model/962456-qidi-x-plus-3-beaconcartographer-probe-mount), original [Beacon mount](https://www.printables.com/model/639766-qidi-x-smartplusmax-beacon-probe-low-profile-mount) also works, but it's slightly flimsier. Make sure to print mount out of something that can sit near bed and wouldn't deform. PAHT-CF is good candidate, ABS and ASA work too, their GF and CF parts even better. PLA and PETG won't survive the bed heat from bed when using higher temperatures **Needed hardware:** **4x M3x14 bolts** original stock probe mount bolts. Stock probe has 2 bolts, there should be 2 extra that came with printer / official upgrade package as spare parts **2x M3 nuts** to secure probe in place. Those didn't come with printer, had to buy **2x M2.5x16** had those with one of Qidi printers as spare parts too, can't remember if it was iFast or X-Max 3 **Optional zipties** to secure cable Do not put cable into cable chain, USB cable is not rated for it, it's good to have it rather loose, so there's no single point that keeps on bending (Some users have reported in Discord, that cable broke after around 1k print hours in cable chain) Good installation would be like this, just 3 rather loose zip-ties to secure the cable [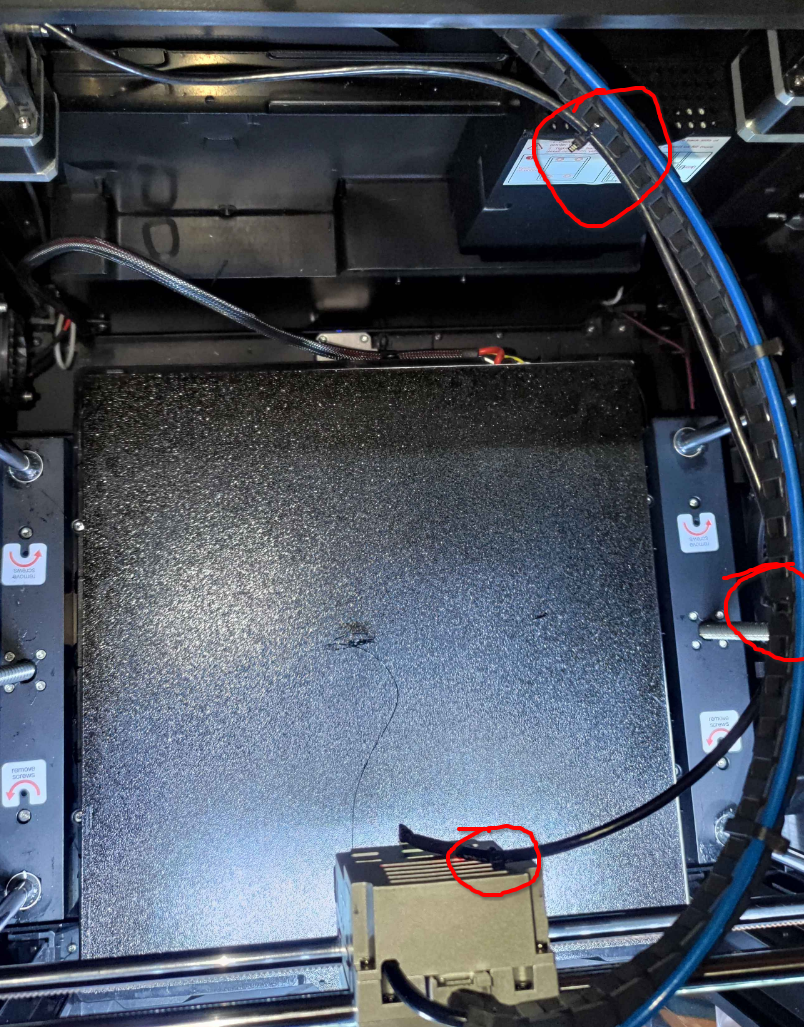](https://openqidi.com/uploads/images/gallery/2024-08/fU4nm6vSqYr3Khqc-image.png) After mounting it, move toolhand manually thro all 4 corners and check that cable doesn't get stuck behind anything #### Software installation For Cartographer software installation you can [refer to it's own doc](https://docs.cartographer3d.com/cartographer-probe/installation-and-setup/klipper-setup), but since there are some changes needed, wrote it down in here also. Follow Carto doc when you know what you are doing. Installing on stock Qidi firmware refer to this doc First of all, need to SSH into printer. You can find printer IP from printer screen under network tab or from router. SSH user is `mks` to printer with `mks@IP\_ADDR` for example `mks@192.168.88.36` Password is `makerbase` By default Qidi printers have wrong system time, first need to update that by running `apt install ntp` and `dpkg-reconfigure tzdata`. Qidi Official wiki has good guide on it: [https://wiki.qidi3d.com/en/Memo/System-Time-Modification](https://wiki.qidi3d.com/en/Memo/System-Time-Modification "https://wiki.qidi3d.com/en/Memo/System-Time-Modification") After updating datetime, going to install Cartographer software. Writing this guide in two parts, **Bed meshing** and **Auto Z offset**, since bed meshing is rather simple, auto z offset requires some more work with older Qidi firmwares ##### Bed meshingEasy way will require minimal changes, but will be limited to having only bed mesh. For auto Z offset need to follow advanced part
1. `cd` -- Make sure you are at home directory 2. `git clone https://github.com/Cartographer3D/cartographer-klipper.git` -- Get Carto software 3. `cd cartographer-klipper` -- Go to Cartographer folder 4. `git checkout v1.0.0` -- This will make you run older version of Carto software, that works with Qidi printers out of box 5. `chmod +x ./install.sh` -- Make Carto installation script executable 6. `./install.sh` -- Execute install script 7. Running installation might give warning about Python version. It's safe to ignore it, since we pinned Cartographer software version to v1.0.0 After cartographer is installed, need to make some modifications to printer config. It's easiest to make it thro printer web UI (Fluidd). It's accessible at printer IP and port 10088, like [http://192.168.88.36:10088/#/configure](http://192.168.88.36:10088/#/configure) (replace IP with your printer IP). For more advanced users, I'd recommend to connect VSCode to printer and edit `~/klipper_config/printer.cfg` directly Inside `[stepper_z]` need to change `homing_retract_dist` ```diff - homing_retract_dist: 8.0 + homing_retract_dist: 0 # cartographer needs this to be set to 0, was 8.0 ``` Inside `[homing_override]` need to get rid of references to `printer.probe`. `printer.probe["x_offset"]` is going to be removed and `printer.probe["y_offset"]` is going to be replaced with `25` (needs to be hardcoded, Qidi older Klipper doesn't work too well with variables, or McSneaky has no idea how to use them) ```diff - G1 X{printer.toolhead.axis_maximum.x/2 - printer.probe["x_offset"]} Y{printer.toolhead.axis_maximum.y/2 - printer.probe["y_offset"]} F7800 + G1 X{printer.toolhead.axis_maximum.x/2} Y{printer.toolhead.axis_maximum.y/2 - 25} F7800 ``` Inside `[bed_mesh]` section need to adjust `mesh_min`. It's also advised to change `probe_count` and `speed`. Those two can be whatever you feel comfortable with. Sweet spot seems to be **speed** somewhere between **150** to **600** and **probe\_count** somewhere around **15** (odd numbers in probe\_count are good, this way bed center point is also probed) ```diff [bed_mesh] -speed:150 +speed:300 #调平速度 CARTO CHANGED, used to be 150 horizontal_move_z:10 #调平中Z抬高高度 -mesh_min:25,10 #探测点最小位置 +mesh_min:25,20 #探测点最小位置 # CARTO CHANGED, used to be 25,10 mesh_max:315,315 #探测点最大位置 -probe_count:9,9 #调平点数 +probe_count:15,15 #调平点数 # CARTO CHANGED, used to be 9,9 algorithm:bicubic bicubic_tension:0.2 mesh_pps: 4, 4 ``` Replace `probe` or `bltouch` section with `cartographer`. Inside `cartographer` default settings need to change `y_offset` to **25** and `serial` to your USB serial To get USB serial run `ls /dev/serial/by-id/` this will give you toolhead ID (`usb-Klipper-rp2040-something`) and Cartographer ID (`usb-Cartographer-something`). Copy / write down Cartographer ID[](https://openqidi.com/uploads/images/gallery/2024-08/GxNNdBIzrB21L7re-image.png) In the end your `cartographer` config should look something like this:Be sure to update "**serial**" and "**y\_offset**"
```yml [cartographer] # PASTE IN YOUR ID TO HERE! serial: /dev/serial/by-id/usb-Cartographer_614e_1C0028001343565537353020-if00 # Path to the serial port for the Cartographer device. Typically has the form # # If you are using the CAN Bus version, replace serial: with canbus_uuid: and add the UUID. # Example: canbus_uuid: 1283as878a9sd # speed: 40. # Z probing dive speed. lift_speed: 5. # Z probing lift speed. backlash_comp: 0.5 # Backlash compensation distance for removing Z backlash before measuring # the sensor response. x_offset: 0. # X offset of cartographer from the nozzle. y_offset: 25 ## BE SURE TO SET TO 25 # Y offset of cartographer from the nozzle. trigger_distance: 2. # cartographer trigger distance for homing. trigger_dive_threshold: 1.5 # Threshold for range vs dive mode probing. Beyond `trigger_distance + # trigger_dive_threshold` a dive will be used. trigger_hysteresis: 0.006 # Hysteresis on trigger threshold for untriggering, as a percentage of the # trigger threshold. cal_nozzle_z: 0.1 # Expected nozzle offset after completing manual Z offset calibration. cal_floor: 0.1 # Minimum z bound on sensor response measurement. cal_ceil:5. # Maximum z bound on sensor response measurement. cal_speed: 1.0 # Speed while measuring response curve. cal_move_speed: 10. # Speed while moving to position for response curve measurement. default_model_name: default # Name of default cartographer model to load. mesh_main_direction: x # Primary travel direction during mesh measurement. #mesh_overscan: -1 # Distance to use for direction changes at mesh line ends. Omit this setting # and a default will be calculated from line spacing and available travel. mesh_cluster_size: 1 # Radius of mesh grid point clusters. mesh_runs: 2 # Number of passes to make during mesh scan. # [safe_z_home] # home_xy_position: 162.5, 162.5 # CARTO CHANGED # # Example home_xy_position: 175,175 - This would be for a 350 * 350mm bed. # z_hop: 3 [gcode_macro PROBE_CALIBRATE] gcode: CARTOGRAPHER_CALIBRATE ```Notice, that in the end there's also macro for **PROBE\_CALIBRATE**, don't forget to paste that in
Finally there's also some references to `printer.probe` in `[gcode_macro M4029]` need to replace them too ```diff - G1 X{printer.toolhead.axis_maximum.x/2 - printer.probe["x_offset"]} Y{printer.toolhead.axis_maximum.y/2 - printer.probe["y_offset"]} F7800 + G1 X{printer.toolhead.axis_maximum.x/2} Y{printer.toolhead.axis_maximum.y/2 - 25} F7800 ``` Now Cartographer is installed and configured. Next step is to do initial calibrationDon't forget to hit "**Save and restart"** in web UI!
#### Initial calibration There's no Qidi specifics in here. There are just two protips: - If bed doesn't want to move up anymore and you get error: "out of bounds". Turn off printer and manually turn bed leadscrews to get bed close to nozzle. About ~5-10mm - Hold your hand on power off switch during calibration and when doing initial test print. In case you did something wrong bed might collide to nozzle. It's good to turn off printer real fast then to not cause damage to PEI sheet Other than that two, follow Cartographer docs: [https://docs.cartographer3d.com/cartographer-probe/installation-and-setup/cartographer-with-input-shaper-v2-and-v3-hybrid](https://docs.cartographer3d.com/cartographer-probe/installation-and-setup/cartographer-with-input-shaper-v2-and-v3-hybrid) ## Everything below is still WIP #### Auto Z offset AKA Carto Survey Cartographer Survey installation consists of two steps: **Updating Carto Klipper plugin on printer** and **Updating Carto own firmware** ##### Updating Carto Klipper plugin First, backup your printer.cfg, then remove all Carto, BLTouch, Scanner and Probe sections in there. Also at the end of printer.cfg remove `[cartographer model default]` section SSH to printer and go to `~/cartographer-klipper` folder. If you don't have that, follow guide for Carto installation above To get latest Cartographer code to your printer: 1. `git stash` to save all your changes 2. `git checkout main` to make your code follow main Cartographer codebase 3. `git reset --hard @{u}` to make sure you have exactly the same code locally in printer, as in Cartographer Github Then run the install script with `./install.sh`. If it gives permission error or sais it's not executable, run `chmod +x ./instal.sh` to make Carto install script executable This will most likely result in some warnings like on image below. They are safe to ignore[](https://openqidi.com/uploads/images/gallery/2024-09/B2AwWKEmC4uFR9ms-carto-tocuh-install.png) Next up, we need to ##### Update Cartographer firmware QIDI Printers use USB version of Cartographer Firmware update requries `pyserial` Python package. To get it, we first need to install **PIP** (Package Installer for Python) 1. `sudo apt install python3-pip` to install PIP for Python 3 2. `pip3 install pyserial` to install pyserial package for Python 3 Download latest version of firmware updater script: [https://firmware.cartographer3d.com/firmware.sh](https://firmware.cartographer3d.com/firmware.sh) It can be put to some random place. Before running it, it requires some modifications. In all the places where there's `~/klippy-env/bin/python` replace it with `python3` ```diff - ~/klippy-env/bin/python + python3 ``` Most likely there's about 10 places where it needs to be replaced Next up, need to make it executable with `chmod +x ./firmware.sh` Run the script `./firmware.sh` You should see something like this. Type in **yes** [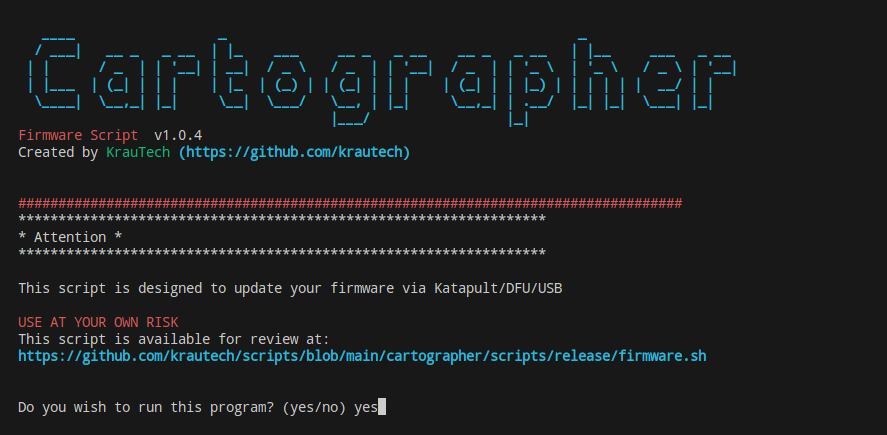](https://openqidi.com/uploads/images/gallery/2024-10/H19pPbr3I1SrZP9s-image.png) Next up, pick **9** [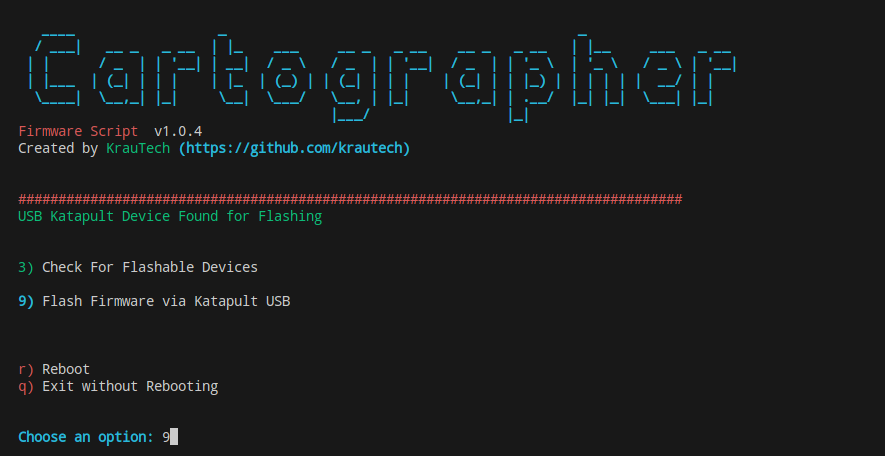](https://openqidi.com/uploads/images/gallery/2024-10/H7Jl9OSaxEo3Bjzu-image.png) Then pick **1** for Survey Touch [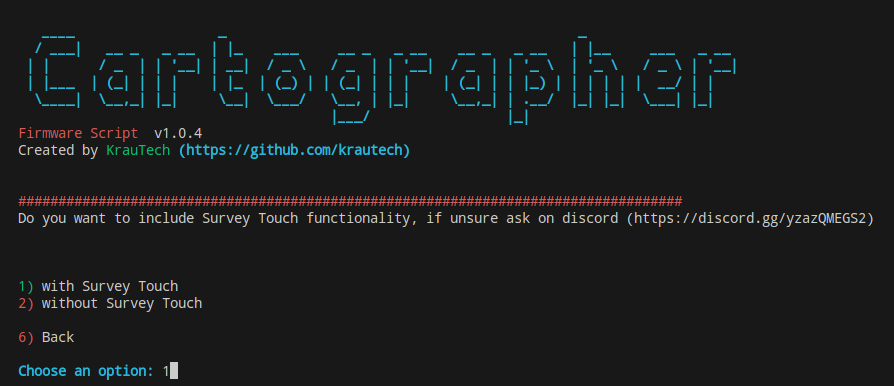](https://openqidi.com/uploads/images/gallery/2024-10/zCJqE7R0MBFUbg92-image.png) Then pick **2** for USB Cartographer [](https://openqidi.com/uploads/images/gallery/2024-10/WmwPEGnkp40VFNcO-image.png) Give it some seconds. You should see nice loading bar and then "Success" [](https://openqidi.com/uploads/images/gallery/2024-10/3v9rlAV22EeKgKdM-image.png) After installing, it will ask for sudo password (makerbase) to restart Klipper It will take you back to beginning. Now need to hard restart printer. Turn off power from back of the printer. Wait for ~10 sec and then turn it back again. You can confirm everything is OK, if you run `ls /dev/serial/by-id` and see **usb-Cartographer** in there. If you see **usb-STM**, then something is off. Try to restart printer again or re-flash Now we get back to installing Cartographer Klipper plugin. It's quite a pain tbh.. ##### Install Fortan compiler First, we need Fortan compiler, coz gotta love Python packages.. `sudo apt-get install gfortran` to install Fortan ##### Increase swap Then, since compiling all those packages takes quite some RAM, we need to increase that. Sadly there's no way to increase RAM itself. Falling back to increasing swap But since swap partition size can't be increased, we'll create new swap file and use that on primary partition You can check your current swap file with `sudo swapon --show` most likely it is `/dev/zram0` 1. `sudo swapoff /dev/zram0` to turn off current swap file 2. `sudo dd if=/dev/zero of=/swapfile bs=1MB count=8192` to create new 8gb swap file 3. `sudo chmod 600 /swapfile` to add correct permissions to swap file 4. Edit **/etc/fstab** with favourite editor and add `/swapfile swap swap defaults 0 0` to the end of it 5. `sudo mkswap /swapfile` to mark that file as swap file 6. `sudo swapon /swapfile` to turn swap back on 7. `swapon --show` to check, if **/swapfile** is in use and everythign is OK ##### Increase /tmp size Actually, there's no nice way to increase /tmp size, since it's on standalone partition, like swap. Since huge /tmp size is only needed by **pip** in install script, we can modify **install.sh** On line about 30, there should be something like this: `"${KENV}/bin/pip" install -r "${BKDIR}/requirements.txt"` Need to prefix it with `TMPDIR=/home/mks/cartographer-klipper/compiler-temp` ```diff - "${KENV}/bin/pip" install -r "${BKDIR}/requirements.txt" + TMPDIR=/home/mks/cartographer-klipper/compiler-temp "${KENV}/bin/pip" install -r "${BKDIR}/requirements.txt" ``` ##### Change requirements :) In Carto folder there's **requirements.txt** file. By default Cart requires stuff for Python 3, but since we are on Python 2, need to downgrade requirements Lower **scipy** and **matplotlib** versions ```diff - scipy>=1.10.0 - matplotlib>=3.7.0 + scipy>=1.2.3 + matplotlib>=2.2.5 ``` ##### Actually installing Klipper plugin Since while Python is compiling things, printer will be totally unresponsive (even to SSH) for several hours. Can expect it to take 1-4h or so To make sure compile keeps on going, it's good idea to start it in screen session and then detach from it. This way compiling isn't tied to SSH session 1. `screen -RL carto` to start new screen session named **carto** with -L to enable logging to file (in case of crashes) 1. This will tell smth about: "new screen started" or something. Press "Enter" 2. `./install.sh` inside screen session 3. Detach from screen by pressing **Ctrl+a followed by d**. Note the lower case 1. If you want to see what's going on, use `htop` or `tail -f ~/screenlog.0` 4. Wait some hours Replace scanner.py with [https://gist.github.com/McSneaky/0e80e1562aa22e112936aed9db1cc062](https://gist.github.com/McSneaky/0e80e1562aa22e112936aed9db1cc062) and follow Carto guide from Configuration step [https://docs.cartographer3d.com/cartographer-probe/survey-touch#configuration](https://docs.cartographer3d.com/cartographer-probe/survey-touch#configuration) # Updating and Flashing the the Toolhead MCU *By Einlander* The Qidi 3 series toolhead is based on the Makerbase THR36 and THR42 toolheads ([https://github.com/makerbase-mks/MKS-THR36-THR42-UTC](https://github.com/makerbase-mks/MKS-THR36-THR42-UTC)). Flashing the qidi toolhead is a similar experience. They both use a Raspberry Pi 2040 MCU and can/are controlled by USB. The major difference is the Qidi toolhead runs 24v over the USB lines. The Qidi printers run a version of Armbian Linux running Debian Buster. # The Process. Here, we will break down the main steps to update and flash toolhead: 1. Compile the Klipper firmware. 2. Set the toolhead to DFU mode 3. Upload the firmware # Assumptions and Prerequisites Wherever possible, we will proceed using the easiest method. Tough updating and flashing the toolhead can be done completely in Linux, we will assume that a Windows PC will be used. Software that will be used is any SSH client (I think Windows 10 has one built-in). I will assume that you know how to acquire, setup and use ssh. > MAKE SURE TO REMOVE ALL USB DRIVES AND MEMORY CARDS! > > They may conflict or make this guide difficult to follow or complete. # Compiling Klipper firmware: ## Connect to printer First we need to log into the printer using ssh as the user mks. You connect by directly connecting to your printer by using it's IP address. The address format is : ``` mks@your.ip.address.here ``` The default password is ``` makerbase ``` [](https://openqidi.com/uploads/images/gallery/2024-01/1iTCJV5Vae5I9rPX-image.png) ## Set the time Before we do anything else, we need to set the time. > Failing to do this step may cause the update process to fail or become more difficult. The command to set the date is ```bash sudo date -s 'YYYY-MM-DD HH:MM:SS' ``` the password is: makerbase [](https://openqidi.com/uploads/images/gallery/2024-01/sXWdTRoQMgGpPeV1-image.png) You can also try this command to try to set it automatically. ```bash sudo date -s "$(wget -qSO- --max-redirect=0 google.com 2>&1 | grep Date: | cut -d' ' -f5-8)Z" ``` [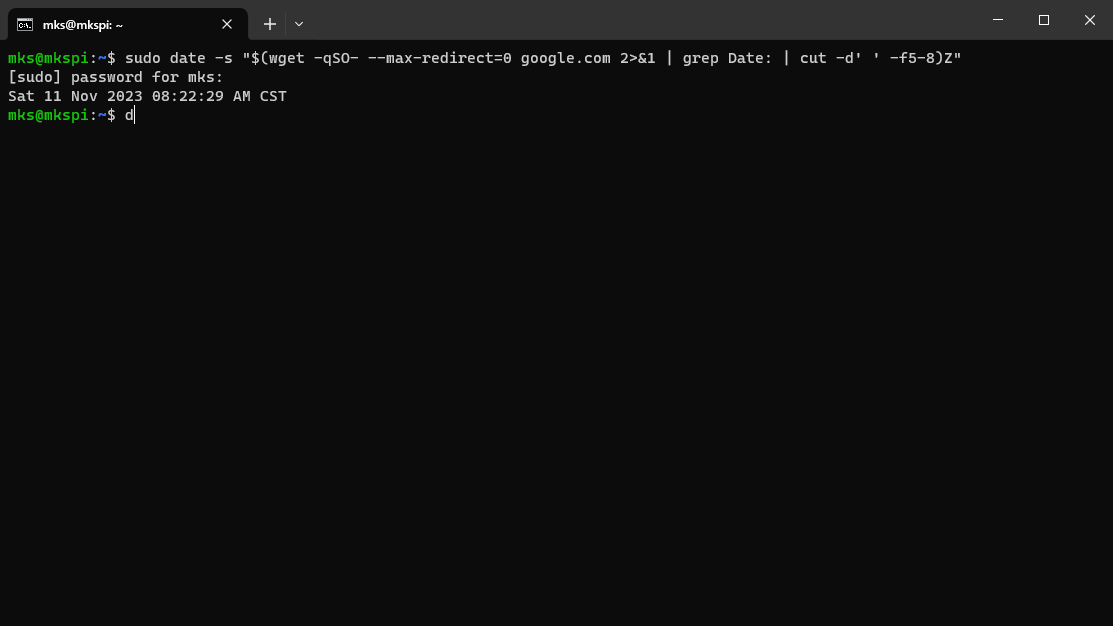](https://openqidi.com/uploads/images/gallery/2024-01/ybeu3YAi3Eg0nelO-image.png) ## Kiauh Now, we are at one of the main parts of updating and flashing the toolhead. For this, we will use [KIAUH](https://github.com/dw-0/kiauh) the Klipper Installer and Update Helper. In our case, it is already installed on the printer. To run it, we must first type this command: ``` ~/kiauh/kiauh.sh ``` > This command will only work when logged in as mks. It will warn you if you use it as root. KIAUH will ask you if you want to update, type: ``` Y ``` [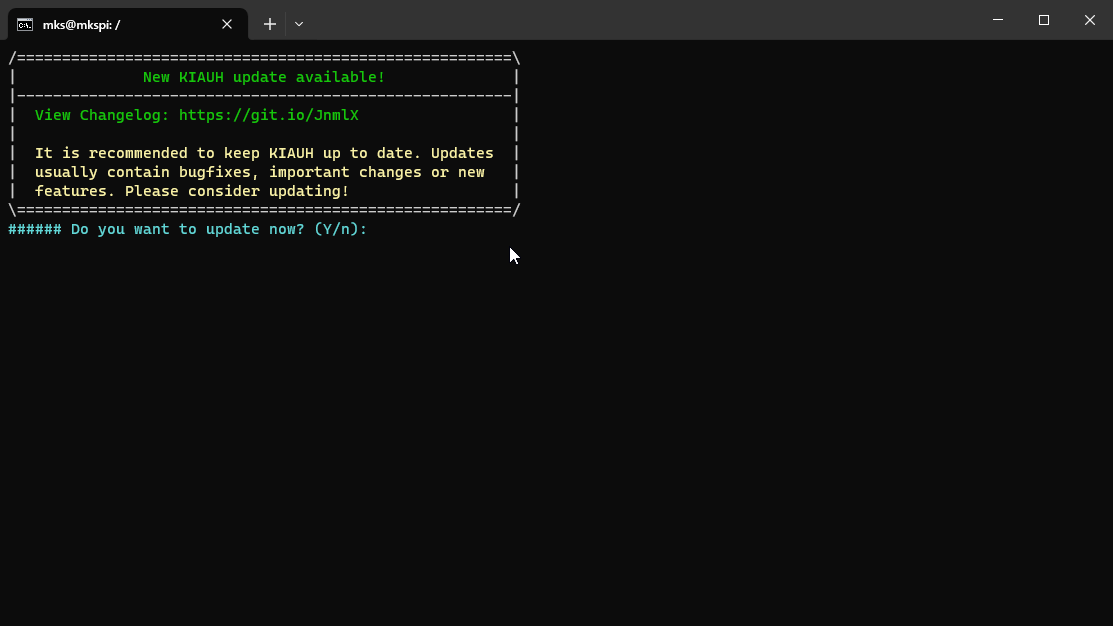](https://openqidi.com/uploads/images/gallery/2024-01/HoubqyhcLIZHVAc9-image.png) After it updates, we need to delete some folders. > This assumes you have never gone through this tutorial before. Qidi has customized some of the files, and KIAUH will fail when it finds them. You shouldn't need to do this in future updates. For our purposes, we will delete the directories. ``` sudo rm -r ~/klipper/ sudo rm -r ~/moonraker/ ``` Start KIAUH again by typing: ``` ~/kiauh/kiauh.sh ``` You should have arrived at the Main Menu screen: [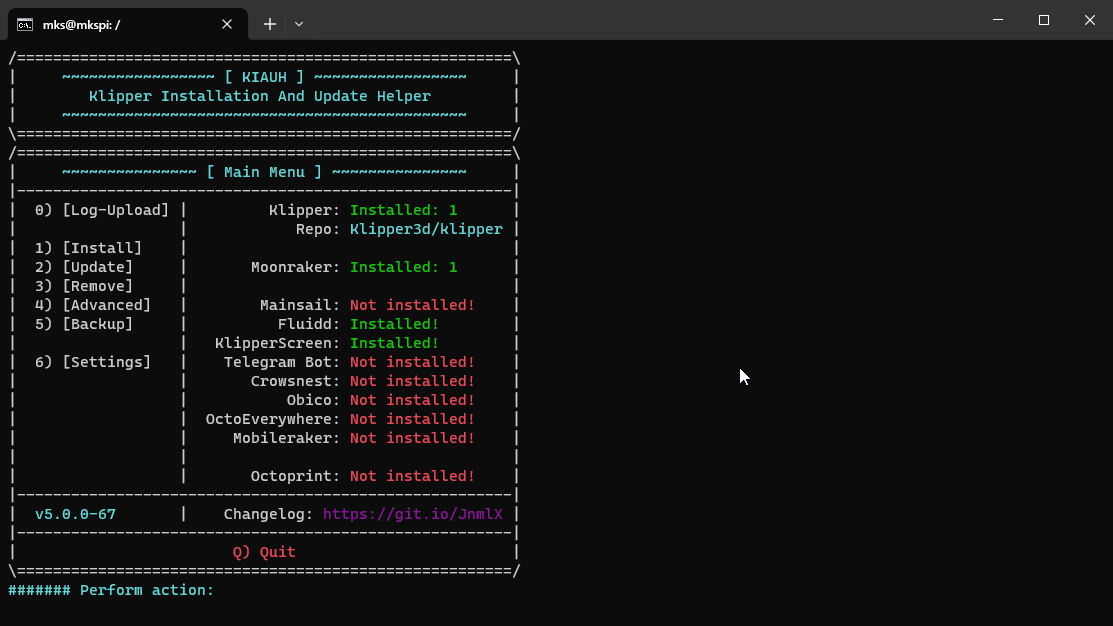](https://openqidi.com/uploads/images/gallery/2024-01/L7o255Yh409Ky56p-image.png) First, we type 3 to get the Remove Menu. [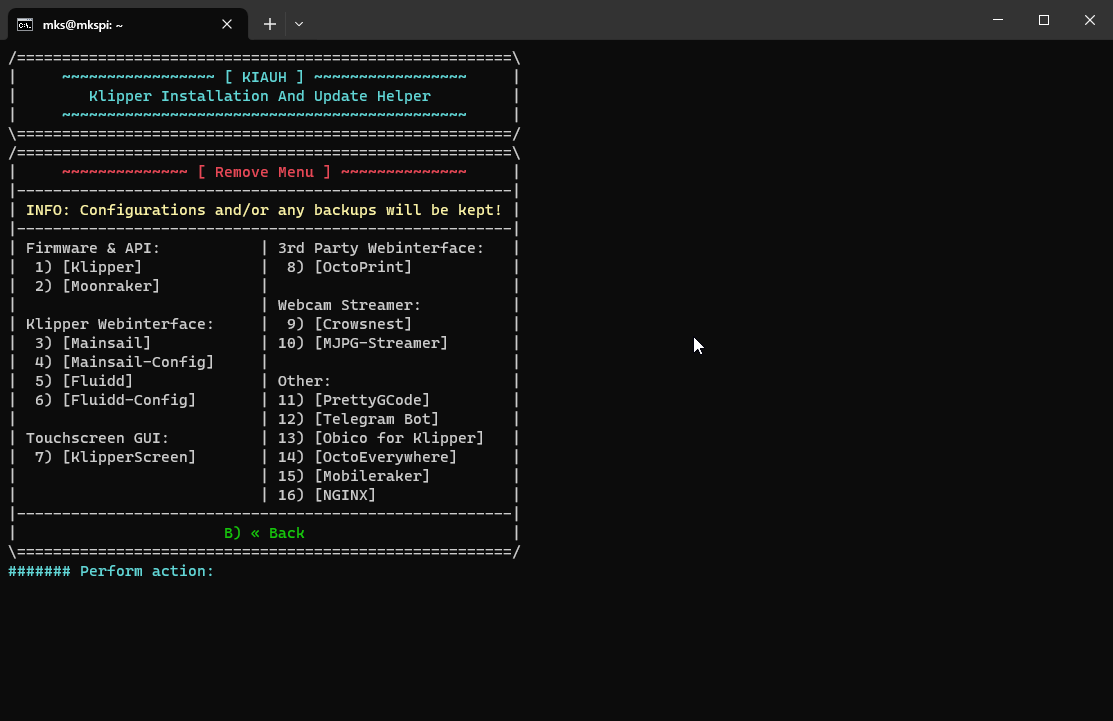](https://openqidi.com/uploads/images/gallery/2024-01/6OMvPH1AZRzdBXC2-image.png) Then we remove 1 Klipper , 2 Moonraker, and 3 Fluidd. When it returns to the Remove Menu, we will Type B to return to the main menu. Type 1 for the installation menu Type 1 to install Klipper. [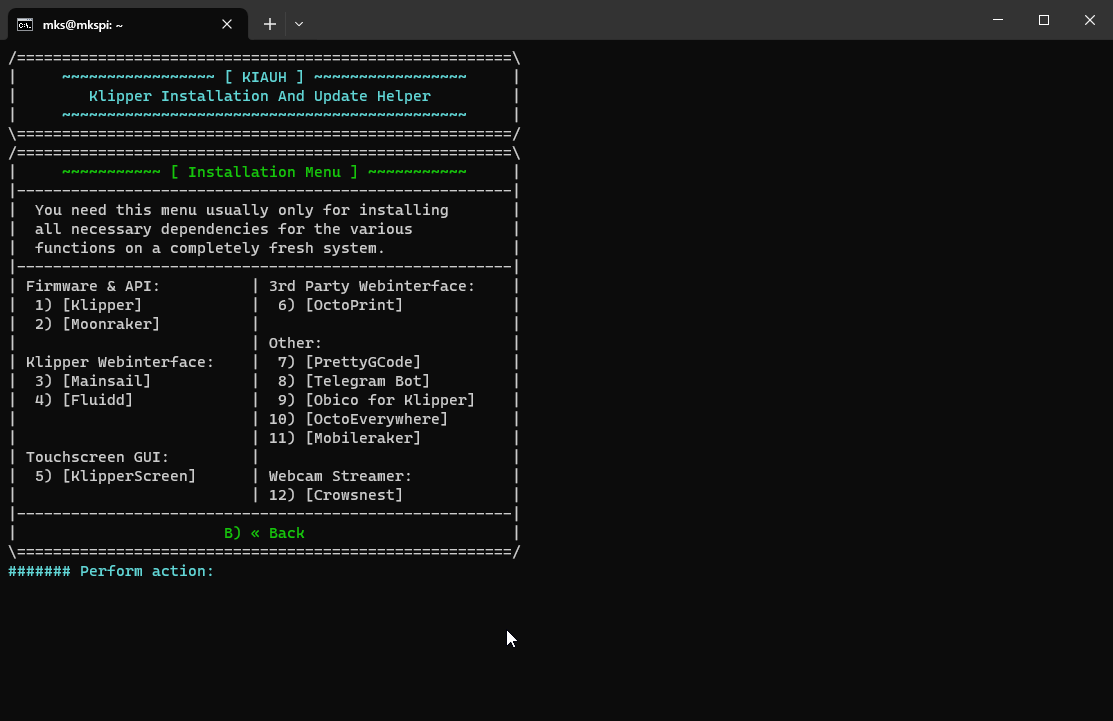](https://openqidi.com/uploads/images/gallery/2024-01/Pz03RR3oW8m7S5cQ-image.png) Type 1 to use Python 3.x [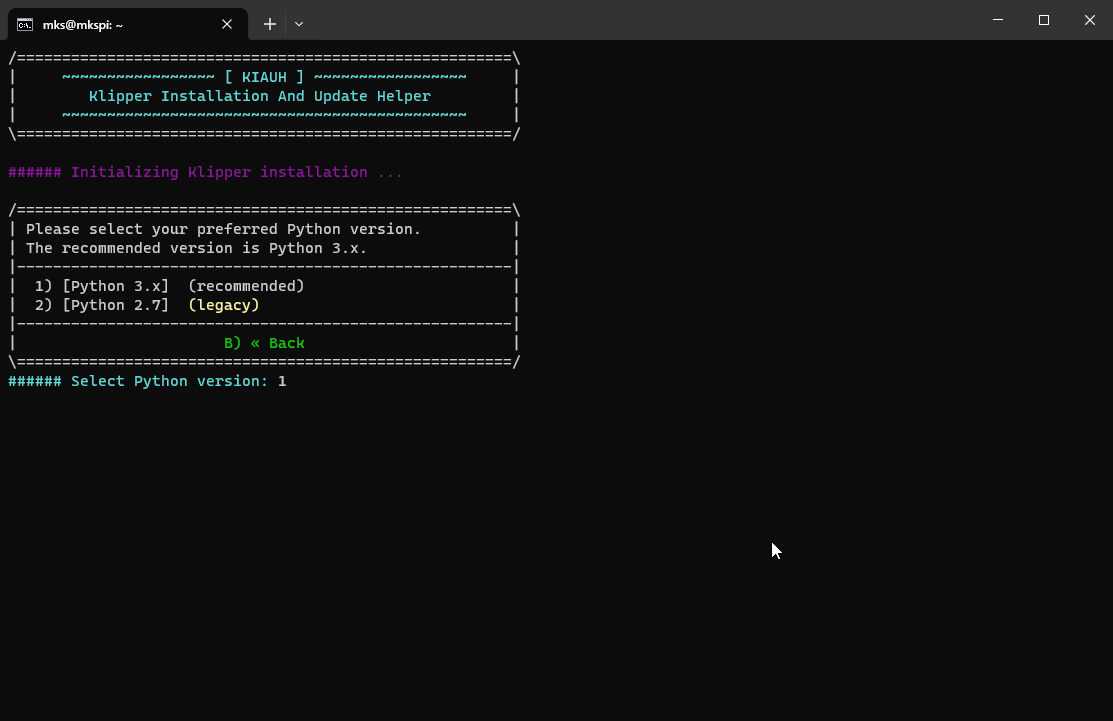](https://openqidi.com/uploads/images/gallery/2024-01/RG79zmXk4bMzZxs2-image.png) Type 1 to run one instance of Klipper [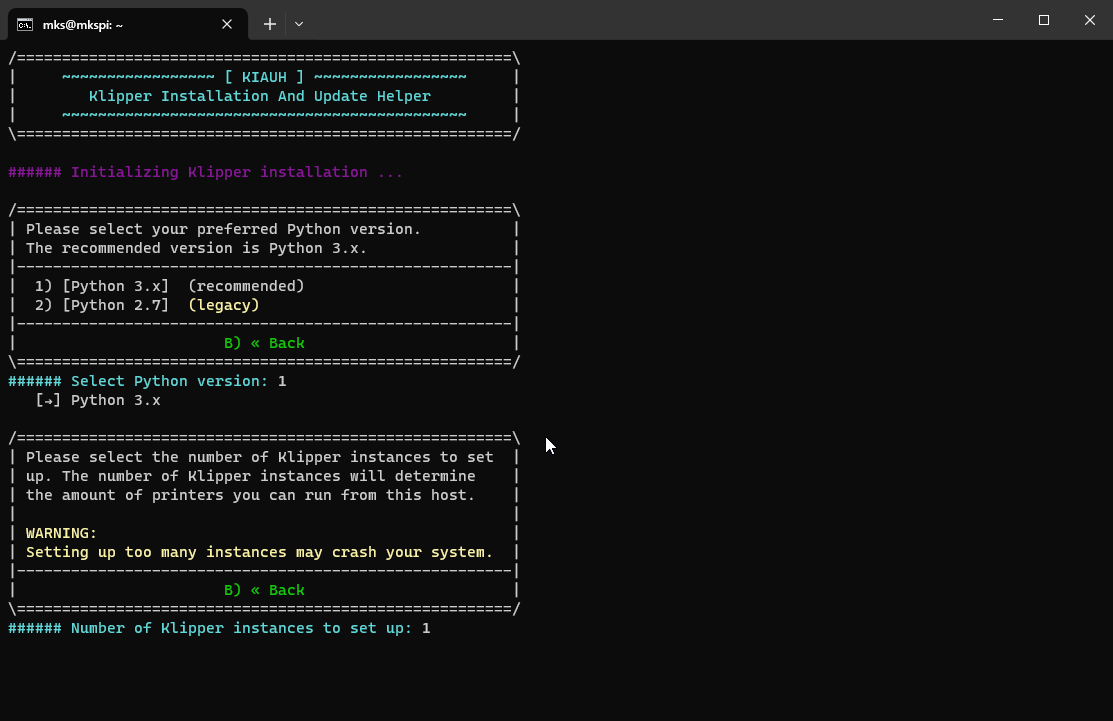](https://openqidi.com/uploads/images/gallery/2024-01/bjaHqx6CysF9az7X-image.png) Wait for it to install. When KIAUH returns to the Installation menu, Type 2 to install Moonraker and wait for the install. Then install 4 Fluidd, answering yes to the questions it asks. [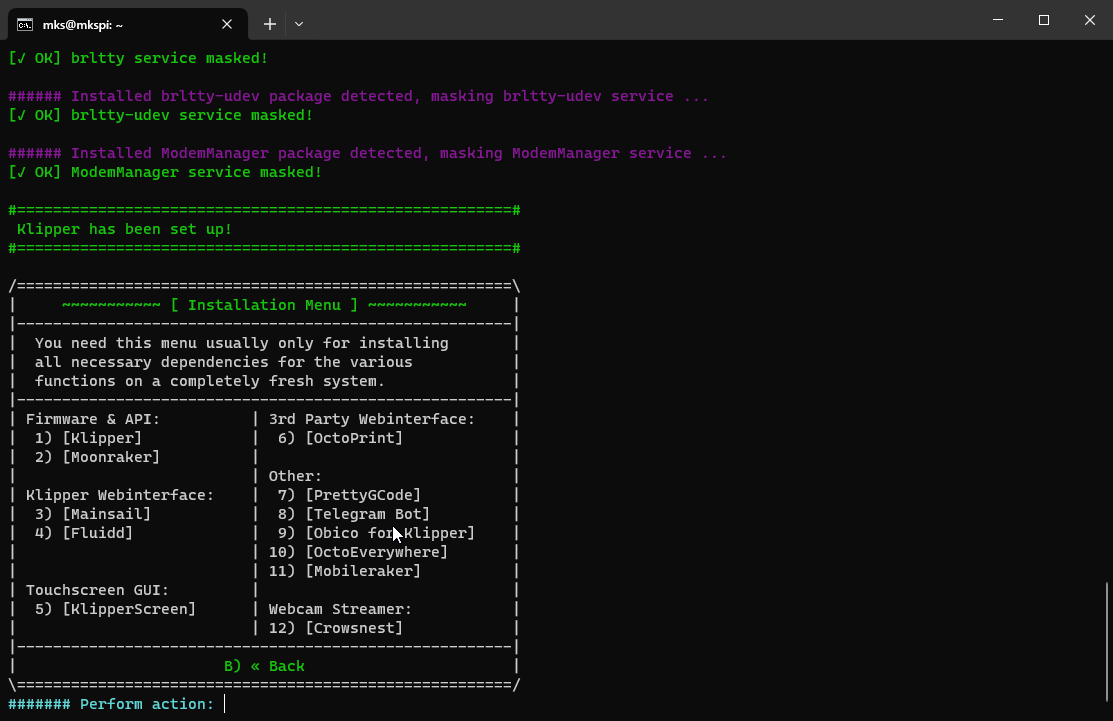](https://openqidi.com/uploads/images/gallery/2024-01/6k2KwIMV8mcVROtv-image.png) Type B to return to the main menu and 2 to go to the Upgrade Menu. Type 4 to upgrade Fluidd, then return to the main menu. Type 4 to go to the Advanced Menu. In the Advanced Menu, we just want to build the firmware. Select: 2 [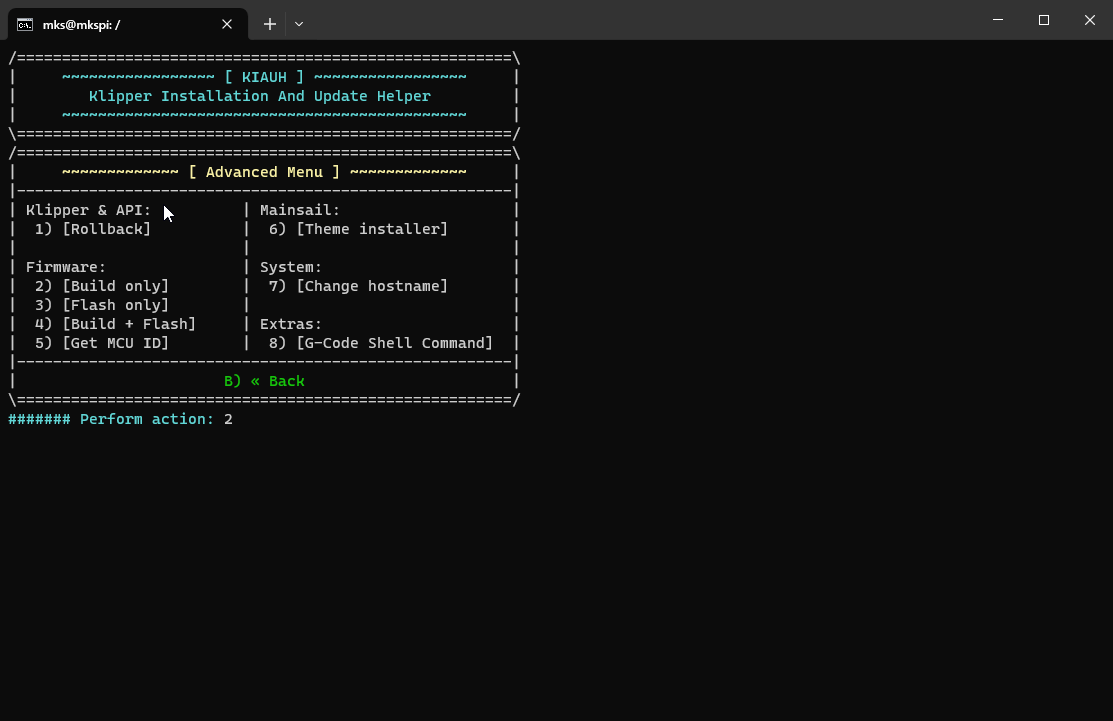](https://openqidi.com/uploads/images/gallery/2024-01/M5zVrFOvA9DLwz9A-image.png) ## MCU Settings The next screen you will see is the Klipper Firmware Configuration screen. Here, we will need to change the settings to match our toolhead mcu. Press space or enter to select items. Select: Enable extra low-level configuration options Select: Micro-controller Architecture (Raspberry Pi RP2040) Then, leave everything else alone. [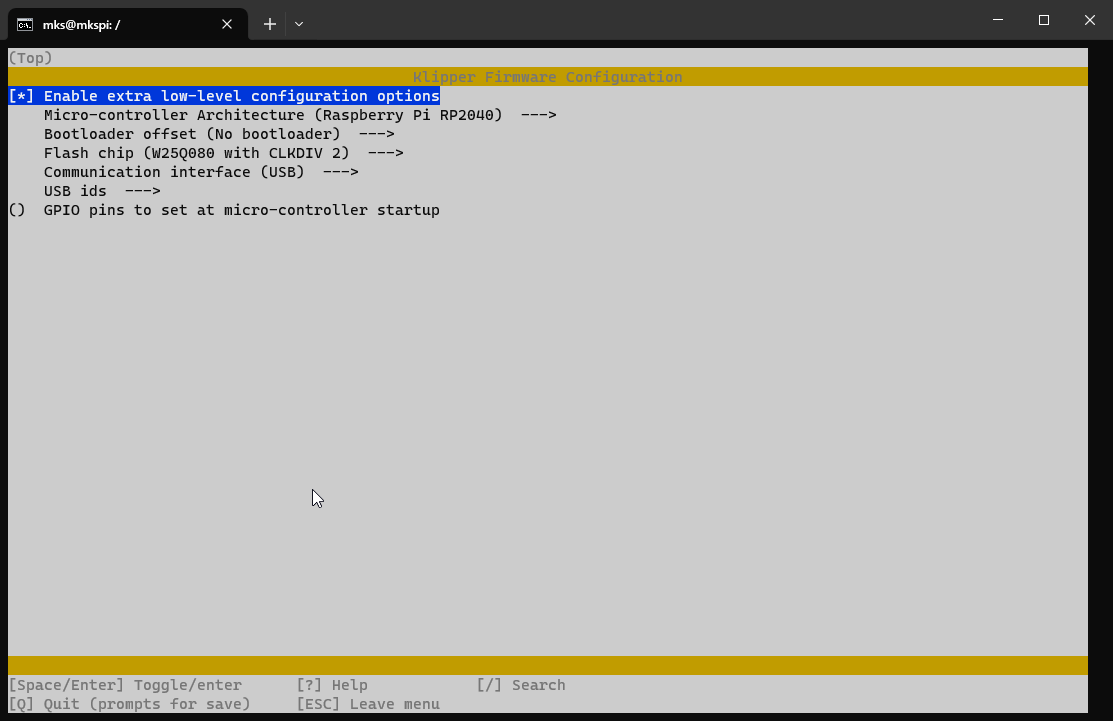](https://openqidi.com/uploads/images/gallery/2024-01/twOx8KWvJdDA4EpW-image.png) Press Q, then Y to save. The firmware will be built, and it will return us to the Advanced Menu. Now, we want to quit KIAHU. Press B to return to the Main Menu and Q to quit. # Setting the toolhead to DFU mode Setting the toolhead to DFU mode requires you to remove the back cover of the toolhead. On the bottom left, there are two buttons labeled BOOT and RESET. [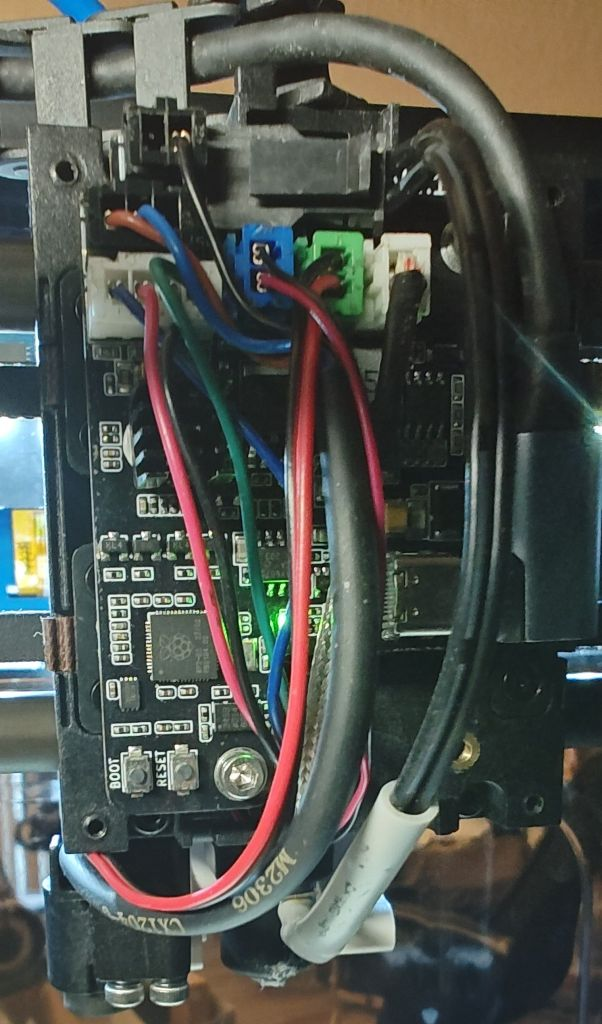](https://openqidi.com/uploads/images/gallery/2024-01/asooRIZ6sCTCUZDj-image.png) The easiest way to put it into DFU mode is to press and hold the BOOT button, press and release the RESET button, and then release the BOOT button. > You have to press the reset button while still holding the boot button. To check if your toolhead is in DFU mode, type: ``` lsusb lsblk ``` > If you see an OpenMoko, Inc. device, it is not in DFU mode. [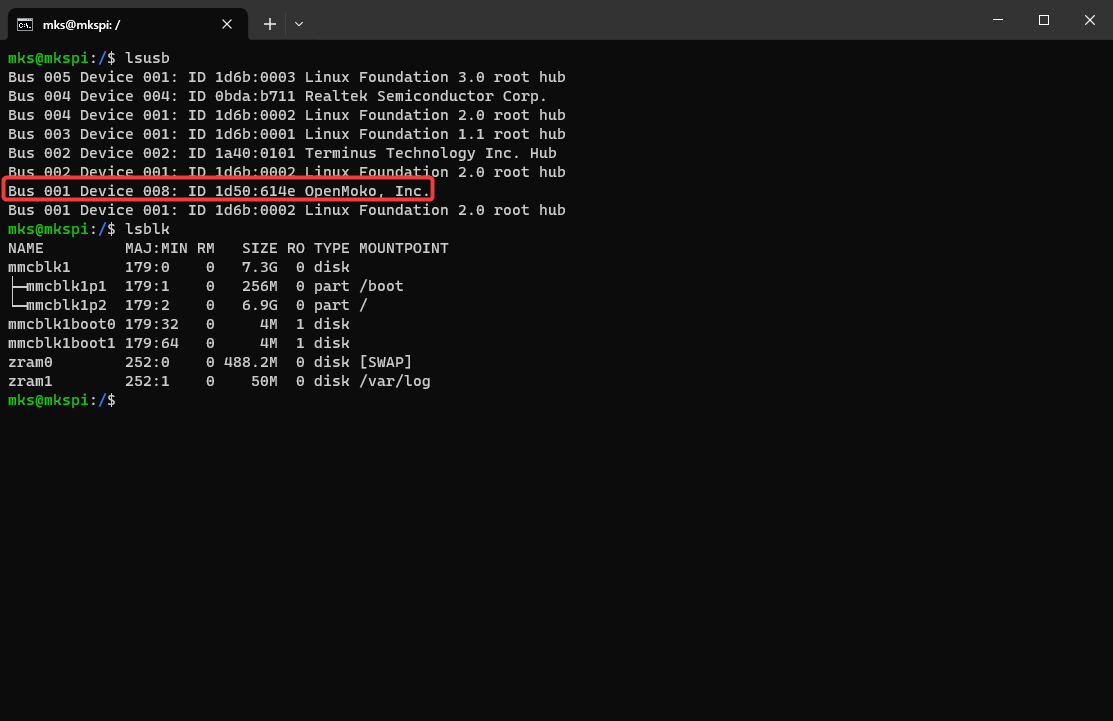](https://openqidi.com/uploads/images/gallery/2024-01/FVQY3Q0UImt9L5pG-image.png) > If you do not see an OpenMoko, Inc. device AND a sda disk with a MOUNTPOINT of /home/mks/gcode\_files/sda1 the toolhead is in DFU mode. > > The disk name may also be named sda, sdb, sdc, etc. [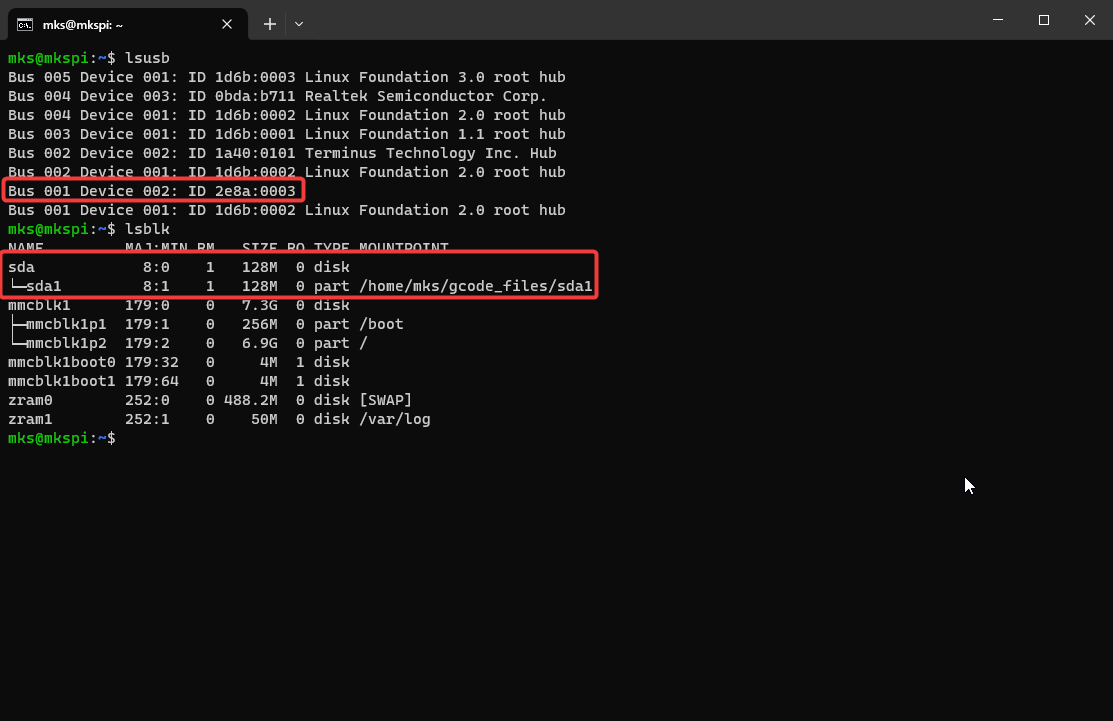](https://openqidi.com/uploads/images/gallery/2024-01/nj5kubnv5WG3aFR2-image.png) # Uploading the Firmware Now that the toolhead is in DFU mode, it will show up as a USB drive to the printer. Luckily QIDI decided to auto-mount USB drives for us. To upload the firmware, we simply need to copy the compiled Klipper firmware file to the toolhead. To do that type: ```bash cp ~/klipper/out/klipper.uf2 ~/gcode_files/sda1/ ``` As soon as the file is copied, the toolhead will no longer be in DFU mode and it will disconnect the drive. # Finishing Up ## Completing Moonraker Update Turn the printer off and on. Then, connect to the web interface. In the console, you may see Moonraker prompting you to go to a specific IP address to complete the update. [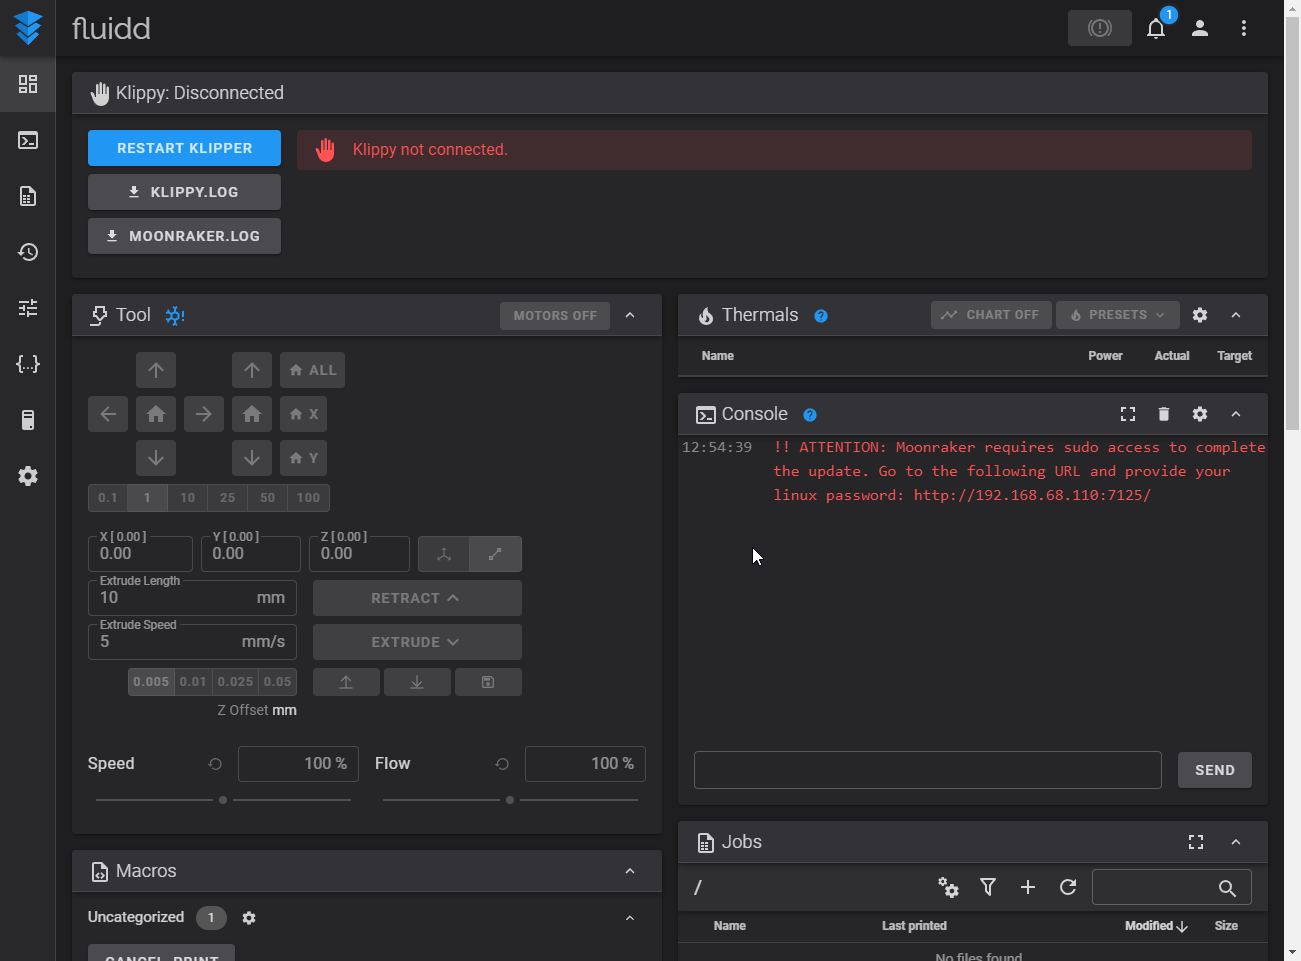](https://openqidi.com/uploads/images/gallery/2024-01/Cxe92aIJ0pubwYqD-image.png) [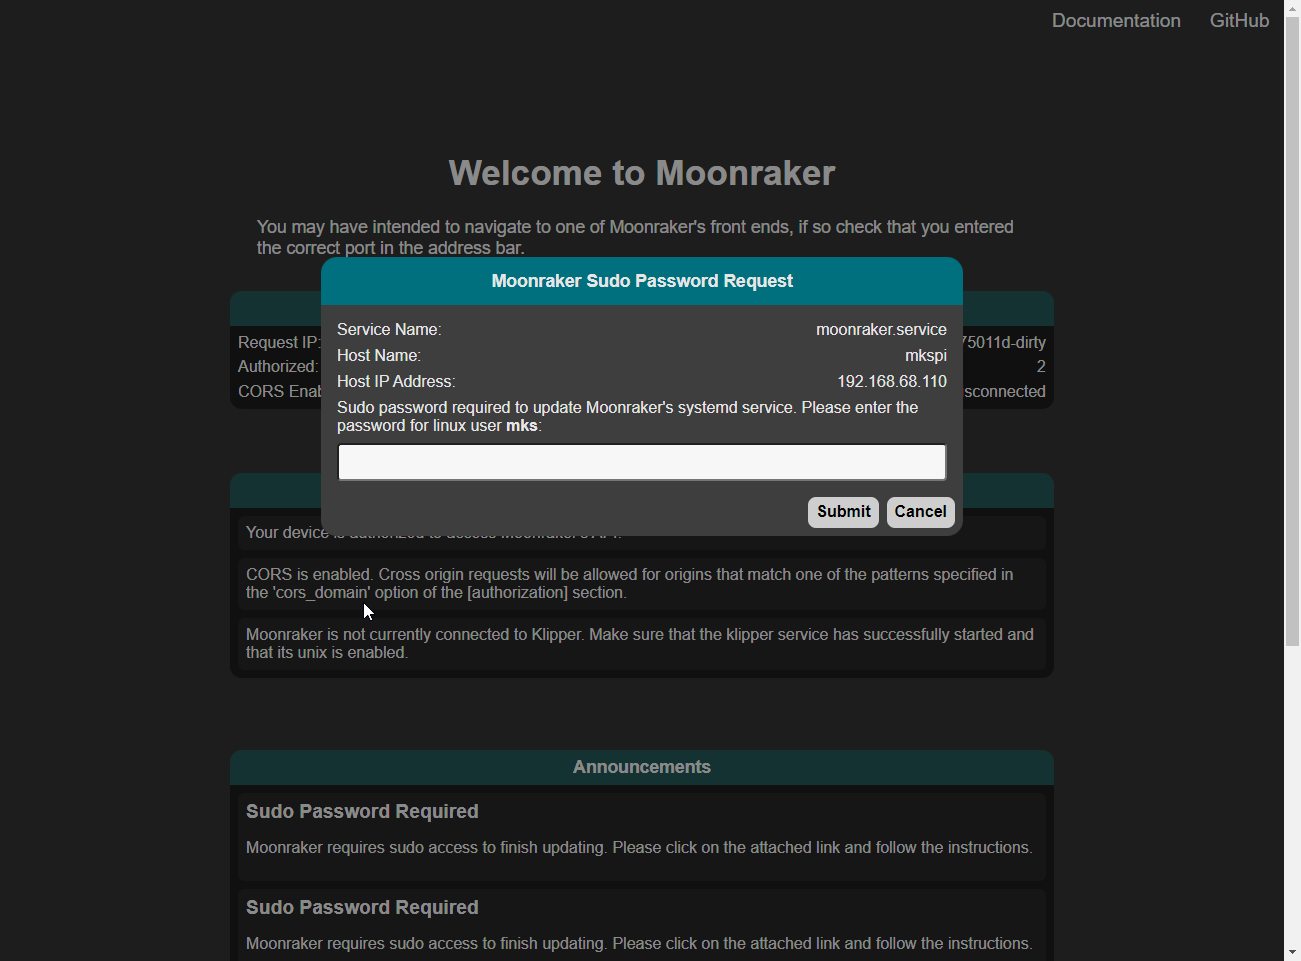](https://openqidi.com/uploads/images/gallery/2024-01/qnPwfgi6foO3q5m6-image.png) Type your mks user password and close the window. [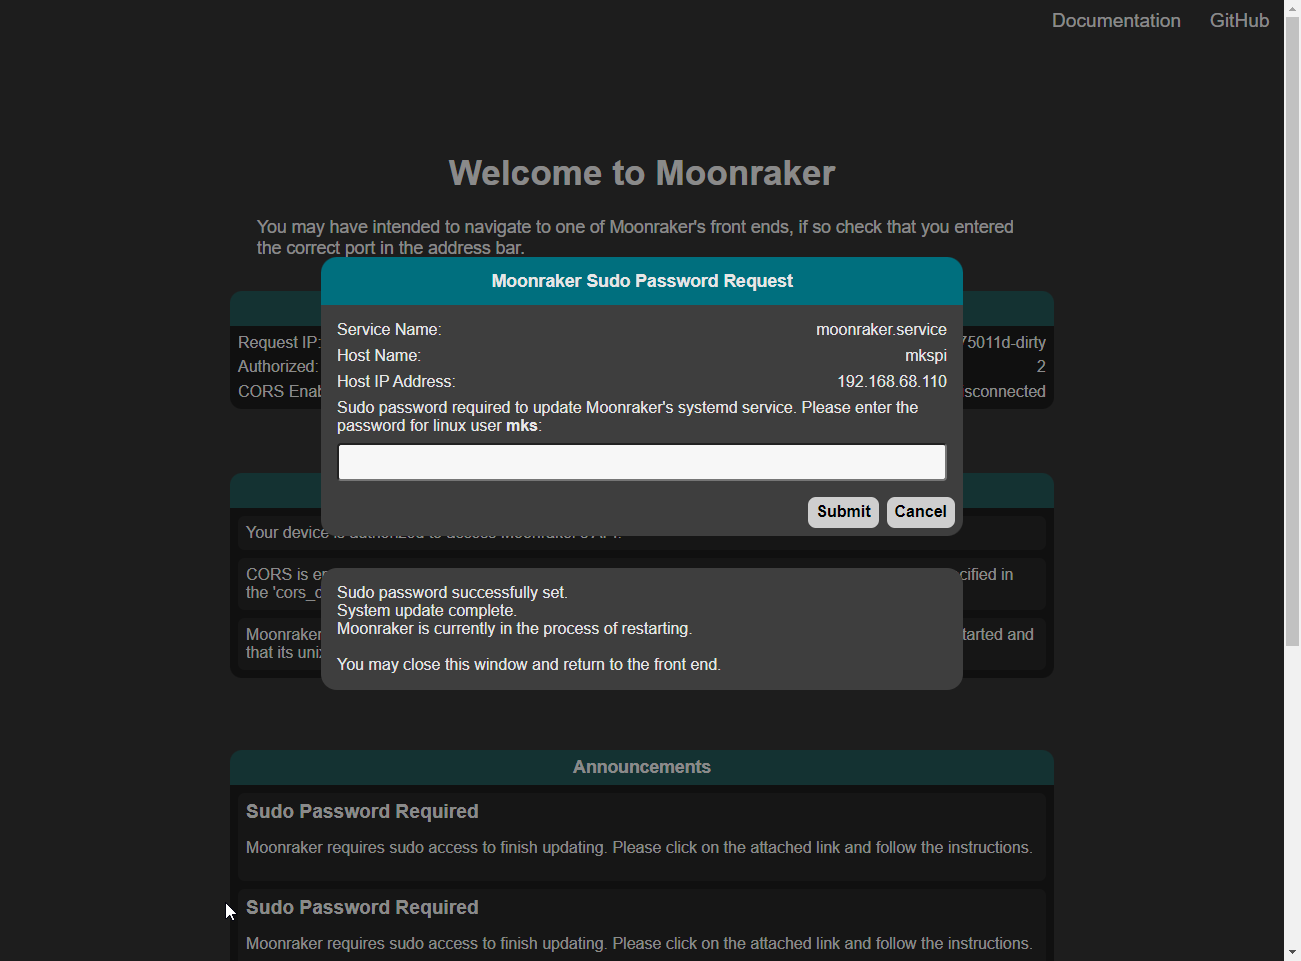](https://openqidi.com/uploads/images/gallery/2024-01/xzwABfL8tATfr9QD-image.png) ## Restoring Settings The new version of Klipper and Moonraker keep their save settings in a different location. We will copy them there. ``` cp -r ~/klipper_config/* ~/printer_data/config ``` ## Connecting Klippy The location of the klippy\_uds\_address has changed. If it tells you "klippy not connected" this may help repair it. From the web interface, edit moonraker.conf to change it to this: ```klipper-config klippy_uds_address: ~/printer_data/comms/klippy.sock ``` ## Restoring Qidi Gcode functionality QIDI added a feature that automatically mounted USB drives which is nice. But in their infinite wisdom, they decided to hard-code the location in their client. So, updating Klipper and Moonraker breaks it. There are 2 methods to fix it. Patch it: ``` sed -i 's/printer_data/gcodes/gcode_files/g' ~/printer_data/systemd/moonraker.env ``` > This method will keep the functionality and directories as it was, but may break in a future update. Create a Symlink: To fix it, a folder needs to be deleted and the old folder symlinked into its place, and the config changed. This method should last longer. ``` rm -r /home/mks/printer_data/gcodes/ ``` ``` ln -s /home/mks/gcode_files /home/mks/printer_data/gcodes ``` ``` sed -i 's:~/gcode_files:~/printer_data/gcodes:g' ~/printer_data/config/printer.cfg ``` ## Updating the printer.cfg Some commands in printer.cfg have been changed. To update them, run: ```klipper-config sed -i 's:printer.probe\["x_offset"\]:printer.configfile.settings.probe.x_offset:g' ~/printer_data/config/printer.cfg ``` ```bash sed -i 's:printer.probe["y_offset"]:printer.configfile.settings.probe.y_offset:g' ~/printer_data/config/printer.cfg ``` # Precautions and incompatibilities The versions of Klipper, Moonraker, and Fluidd installed will be updated. Avoid using the Qidi updates, it will overwrite the updated installation and the versions may be incompatible. > There is an issue with saving the z offset if you run the official/mainline version of Klipper. The software Qidi runs on the machine saves it's own copy of the zoffset. It interferes with klipper by adding it's copy of the zoffset to klippers zoffset resulting in either printing in the air, or grinding into your print bed. # Beacon Rev H Probe Installation In case you need the mount for Rev H check this one out. [https://www.printables.com/model/727356-qidi-x-3-series-beacon-rev-h-probe-mount-further-i](https://www.printables.com/model/727356-qidi-x-3-series-beacon-rev-h-probe-mount-further-i) # Shaketune Klippain Belt Magic ### You want to use the fantastic Shaketune Repo for your Qidi? ####**Note: latest version of Klippain requires an updated version of Klipper. Therefore it is not possible to achieve the installation of Klippain following the guide below.**
**Older version of Klippain 2.5.0 is also not working because of missing dependency on matplotlib==3.8.2 that cannot be installed on latest Qidi firmware (Jan 2024).**
**You can try to use the old version of Klippain 1.2.0** --- With those limitations in mind, continue on: No Prob. Go here and install everything: [https://github.com/Frix-x/klippain-shaketune/blob/main/install.sh](https://github.com/Frix-x/klippain-shaketune/blob/main/install.sh) [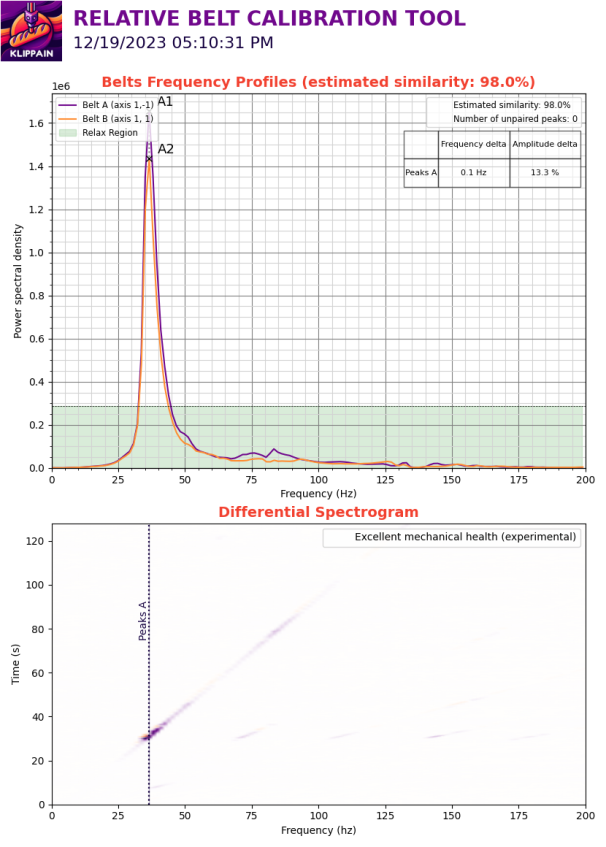](https://openqidi.com/uploads/images/gallery/2024-02/yW0Kn5MJerhT1o4P-image.png) ### Preparation Qidi uses old v10 Klipper in the stock configuration. This means you have problems and manually need to change pathways. Before you do anything set the system time correct via SSH! #### SSH: ssh mks@IP password: makerbase #### NTP install and useful alternatives to check out: apt install ntp and then dpkg-reconfigure tzdata to select timezone sudo date -s '2023-12-02 10:22:00' sudo ntpdate -s ntp.ubuntu.com (doesn't work) #### \_\_\_\_\_\_\_\_\_\_\_\_\_ https://klp1.com/issues/wrong-time/ Wrong system time & date - KLP1 Knowledge Base Fix wrong time and/or date that's showing in history, logs and console Wrong system time & date - KLP1 Knowledge Base if chrony doesn't autostart you can add a crontab line from root account @reboot /usr/sbin/chronyd Wrong system time & date SSH to the IP address of KLP1. Login with username root and password makerbase. Run command sudo dpkg-reconfigure tzdata and select your timezone. Time zone should now be set correctly, now you need to enable time syncing. Run sudo apt-get install chrony -y. This will uninstall ntp and install chrony, a service used to sync time.s Run timedatectl to check if the time and date are now properly synced. mks@mkspi:~$ timedatectl Local time: Fri 2023-11-17 21:56:55 CET Universal time: Fri 2023-11-17 20:56:55 UTC RTC time: Fri 2023-11-17 20:56:54 Time zone: Europe/Zagreb (CET, +0100) System clock synchronized: yes NTP service: inactive RTC in local TZ: no Comments #### Change pathways Qidi uses other paths for Klipper binaries and config in stock v10 Klipper. You simply need to adjust those paths used by all python scripts. Klipper config -> /home/mks/klipper\_config/ Klipper binaries -> /home/mks/klipper/ #### Copy commands: Copy Command to transfer stuff and generated graphs to your USB drive. cp cd /printer\_data/config/K-ShakeTune\_results/belts cd printer\_data/config/K-ShakeTune\_results/ cd /home/mks/gcode\_files/sda1 cp -r K-ShakeTune\_results /home/mks/gcode\_files/sda1/20231203 mks@mkspi:~/printer\_data/config/K-ShakeTune\_results/belts$ cp belts\_20231126\_053146.png /home/mks/gcode\_files/sda1/belts\_20231126\_053146.png # Make WiFi work on vanilla Klipper Qidi machines with Tenda dongle and RTL8188GU chip You have a Vanilla Klipper installed on your machine!? To enable WiFi on the Qidi machine a kernel module has to be loaded and will manage the WiFi dongle present in your machine. Qidi machines coming with a Tenda technlogies dongle equipped with RTL8188GU chip. Some Linux commands are required to make it work.Please dig into it and understand what it means. I will summarize the most important things here. [](https://openqidi.com/uploads/images/gallery/2024-05/Sgksp1LShb9Qfvv6-image.png) 1\) You should use a rather new version of Armbian. I use this fantastic release here: [https://github.com/redrathnure/armbian-mkspi](https://github.com/redrathnure/armbian-mkspi) [](https://openqidi.com/uploads/images/gallery/2024-05/bEhj5jjzjxTAGHbX-image.png) 2\) Depending on your release you have to make sure that you de-freeze your Kernel and install Kernel headers. This is required because you need usb-modeswitch. In case you install However in case you use [0.3.4-24.2.0-trunk](https://github.com/redrathnure/armbian-mkspi/releases/tag/mkspi%2F0.3.4-24.2.0-trunk) with an edge 6.7 Kernel all your problems are solved and you can jump to the next step. #### Update your system `sudo apt-get update` #### Install armbian firmware `sudo apt-get install armbian-firmware-full` #### List your usb devices, possibly you see realtek device in "CD ROM Mode" `lsusb` #### Fix with usb-modeswitch `sudo apt-get install usb-modeswitch` #### command `sudo usb_modeswitch -KW -v 0bda -p 1a2b` ### If successful you see something like this: [](https://openqidi.com/uploads/images/gallery/2024-05/jLbPBmb6FmWbnVkg-image.png) 3\) Check if you have the module up and runnng. In my case it never worked. perform: `sudo armbian-config `or `nmtui` No wireless device is showing up here... [](https://openqidi.com/uploads/images/gallery/2024-05/EERnZ8bzXnB1TIyG-image.png) Also check your status from time to time with these useful commands: `lsusb` `lsblk` `sudo iwconfig` [](https://openqidi.com/uploads/images/gallery/2024-05/csXVUqNR6NPBeMOy-image.png) I loaded rtl8xxxu module with `sudo lsmod | grep rtl` and `sudo modprobe rtl8xxxu` [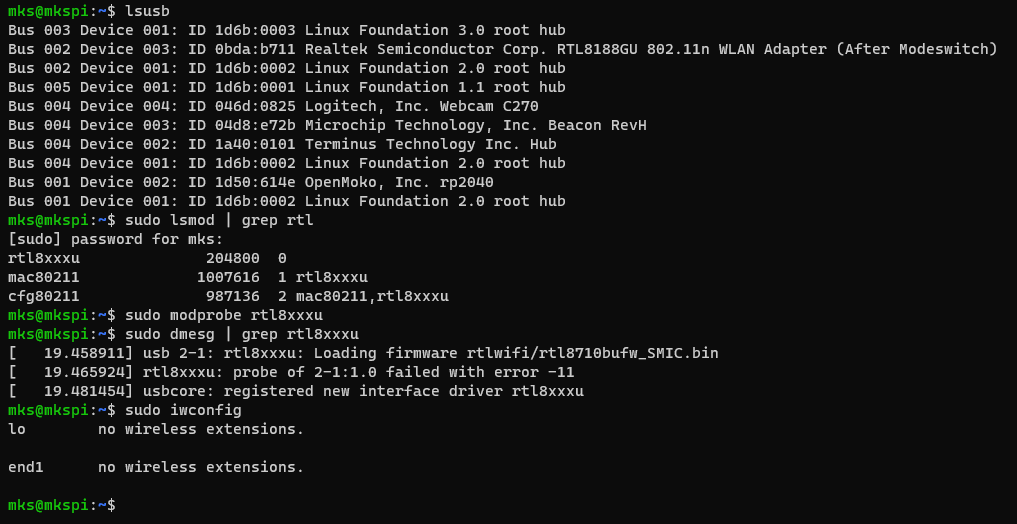](https://openqidi.com/uploads/images/gallery/2024-05/Ukg5mxzG95jiHX62-image.png) Still no effect. Really dont know why. It should work by now. 4\) Install another driver! What worked for me is this one from wandercn. There are many other drivers available but this one is stable and fast. (Source: [https://github.com/wandercn/RTL8188GU](https://github.com/wandercn/RTL8188GU)) ``` lsusb|grep WLAN ```All actions are at your own risk. Modifying the printer in this way will invalidate the warranty! None of us are responsible for any problems associated with this manual. If you do not feel comfortable with the steps shown on this page - **STOP**.
Before taking any step, common sense dictates that you read the **ENTIRE GUIDE** before making any changes.
#### Abbreviations - *configuration file* - /config/printer.cfg file - *macros* - - *homing macro* - #### **** **** #### Introduction From the moment I discovered Cartographer, I wanted to use it all the time. After waiting for the order and finally being at my desk, I could start the installation and configuration on my QIDI X-Max 3 with Vanilla Klipper \[[1](https://github.com/leadustin/QIDI-up2date-english/blob/main/Klipper-Update/update+upgrade.md)\], because it's always cool to have up to date software and use whatever extension/functionality you want (Spoolman! - from this point on I have a database of my stock). It was not easy, but with the help of McSneaky (he is a f\*cking guru) I was able to say "It's alive! I've included all the sources at the bottom of the page if you want to dig deeper (do it - I encourage you NOT to trust me and check every point, even though the whole setup works). ##### To do - set the position of the nozzle when homing to the centre of the bed (there is no effect on the bed mesh or the probe behaviour). ##### TL;DR Configuration files (**blue pill**). Use my configuration file and the macros \[[2](https://drive.google.com/file/d/15s56RrGnDsqp3EQyPislcNXO5nyOK20N/view?usp=drive_link)\] that works with the printer. Note that you'll have defined all the plugins I use in my setup (Spoolman, Crownest, etc). I encourage you to modify your printer files to match your setup. You have been warned. #### Hardware This article is not intended to guide you through the full installation process on the printer itself, but in a nutshell; download the probe holder model provided by McSneaky \[[3](https://www.printables.com/pl/model/692991-qidi-x3-series-beacon-cartographer-probe-low-profi)\] (make sure you print in min. ABS/ASA - my suggestion - PC). #### Software (**red pill**) ##### Installation Follow the official Cartographer wiki page \[[4](https://docs.cartographer3d.com/cartographer-probe/installation-and-setup/klipper-setup)\]. This is straightforward and requires no change in procedure. ##### Configuration This is the heart of this guide, as several things need to be modified. At first I followed the official wiki \[[5](https://docs.cartographer3d.com/cartographer-probe/installation-and-setup/cartographer-with-input-shaping-v2-and-v3-hybrid)\], but then I discovered that a few things need to be done differently. Check your UUID (CAN version) or serial port (USB version): USBNow all safety limits in the Klipper configuration are **DISABLED**. Be aware that you need to be careful and do things slower rather than faster and for God's sake, observe the behaviour of your printer and make sure you have easy access to the OFF button on the back of the X-Max 3.
Going back to the calibration procedure, we are now forcing the printer to move \[[6](https://www.klipper3d.org/Config_Reference.html?h=pixel#force_move)\] and Klipper will not be aware of the physical location of the nozzle. This is fine for now and we will correct this in a few ticks. According to the official Klipper documentation \[[7](https://www.klipper3d.org/G-Codes.html#force_move_1)\], you must use the following syntax to force the printer to move: `FORCE_MOVE STEPPER=Version 2.0+ means that a lot of this information is way out of date. I'll try to update at some point in the future, but, their own Wiki has improved SIGNIFICANTLY and I'd strongly recommend you start there: https://freedi-wiki.github.io/
Link to the official source: [https://github.com/Phil1988/FreeDi](https://github.com/Phil1988/FreeDi) Their [guide ](https://github.com/Phil1988/FreeDi/wiki)for the actual process. Phil1988 On Reddit: [https://www.reddit.com/user/C0co\_33/](https://www.reddit.com/user/C0co_33/) Post on Reddit announcing project release: [https://www.reddit.com/r/QidiTech3D/comments/1i9i2zf/xsmart\_3\_eol/](https://www.reddit.com/r/QidiTech3D/comments/1i9i2zf/xsmart_3_eol/)Note: The below is copy and paste with slight tweaks, directly from the GitHub page. Current as of 2025/02/02 I am just a fan of the project and am not affiliated with them in any way. When you're looking for a release for your first time flashing, you'll want to look for something with the header that contains 'Image' as creating full system images for each (minor) release is quite a lot of work and not done each time.
### FreeDi A project to enhance QIDI's X3 printers with custom LCD firmware, cutting-edge software, and OTA updates. **Together, let's unlock the full potential of your printer!** ### Getting Started If you want to start, head over to the 📖 Wiki and follow the complete [installation guide](https://github.com/Phil1988/FreeDi/wiki/Installation-guide). 📹 or Watch the full installation video [](https://www.youtube.com/watch?v=_ZmSTJBWUus) But I invite you to read the other parts as well! 😊 ### What Is FreeDi? **FreeDi** is a comprehensive upgrade package designed to enhance your printing experience. Here's what it offers: - **Custom Display Firmware**: Built from the ground up for maximum usability. - **Seamless Display Software**: Ensures fast and reliable communication between the printer and the stock display. - **OTA Updates**: Update your firmware in ~4 minutes -no more USB drives or 40-minute waits! - **Optimized Configuration and Macros**: Streamlined for better performance and usability. - **Latest Software Stack**: - **Armbian OS Bookworm** (replacing Buster) - **Klipper 0.12.0+** (latest, unmodified) - **Moonraker v0.9.3+** (latest, unmodified) - **Mainsail v2.13+** (latest, unmodified) - **Python 3.12** (upgraded from 2.7) - **KIAUH** integration - **Latest LTS Linux Kernel** (6.6.x) ### 🖨️ Supported Printers #### Currently Supported: - **X-Max 3** - **X-Plus 3** - **X-Smart 3** #### Coming Soon - **Q1 Pro** (Estimated Release: April 2025) #### Potential Future Support: - **Plus 4** *(Looking for Klipper/Python experts—contact me if interested!)* ### ❓ Is FreeDi Right for You? #### **Not for You If...** - You're satisfied with the stock system. FreeDi is here to enhance, not persuade. - You're facing hardware issues. FreeDi is software and can't do magic - even if it sometimes still feels magical for me ;) #### **Perfect for You If...** - You want an **open, up-to-date system** with no compromises. - You need access to **advanced software features and plugins**: - Additional features (Spoolman, Shake&Tune, etc.) - Tune and adjust your printer precisely using accurate software measurements (eg. Shake&Tune) - You're tired of stock software bugs causing: - **Nozzle crashes** into the print bed. - **Bed slamming** into the printer bottom. - **Print head collisions** without emergency stop options. - **Missing or poor-quality thumbnails** on-screen. - Annoying "**SYSTEM STARTS ABNORMALLY**" errors.|  | NOTE: This is an animated gif in the original source: [](https://openqidi.com/uploads/images/gallery/2025-02/ZjDW8LjoMyPq9S2K-image.png) |
| [](https://openqidi.com/uploads/images/gallery/2025-02/Ithnc081cHbAXVfP-image.png) | [](https://openqidi.com/uploads/images/gallery/2025-02/2jBw1Jx6K0JKb9Ip-image.png) |
Not copy and pasting that any further due to the fact that it'd go out of date quite quickly and because the last thing I copy and pasted explicetly asks that we don't do that!